Printing Document in Center of Paper
When you want to position the source document in the middle of the cut sheet and print, or print with even margins on the right and left in relation to the width of the roll paper, use the Print Centered function.
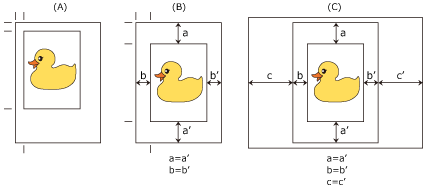
The print results when setting with Print Centered are as follows. Normally, if Print Centered is set when printed as in (A), it will be printed as in (B) for cut sheet and (C) for roll paper.

 Note
Note
- When setting the magnification using Scale in the Page Setup Dialog, a fixed point at the upper left corner of a page is always used as a start point for enlarging or reducing the page. For that reason, when performing reduced printing, the bottom and right margins of the paper will increase. At this time, if you place a checkmark next to Print Centered, the top, bottom, left and right margins can all be printed evenly.
The procedure for printing to the center of the paper is as follows:
Select the paper size
From Paper Size, select the size of the paper you want to print.
Select Quality & Media from Printer Options
Select the media type
For Media Type, select the same paper type loaded in the printer.
If Auto (Use Printer Settings) is selected, the paper configured in printer settings is printed.
Select the paper source
For Paper Source, select the setting that matches your purpose.
Select Page Processing from Printer Options
Selecting Roll Paper Width
If you selected a roll paper for Paper Source, set Roll Paper Width to the width of the roll paper loaded in the printer.
Print document in the center of paper
Check the Print Centered check box.
Complete the setup
Click Print.
When you print, the printer automatically lays out the document to the center of the page and then prints it.
 Important
- When you select "XXX Borderless" from Paper Size in the print dialog, the Print Centered is grayed out and cannot be selected.
