
Printing a Nozzle Check Pattern
The nozzle check function allows you to check whether the print head is working properly by printing a nozzle check pattern. Print the pattern if printing becomes faint, or if a specific color fails to print.
The procedure for printing a nozzle check pattern is as follows:
Nozzle Check
Select Utilities from Remote UI
Click Nozzle Check
Before printing the nozzle check pattern, check the following items:
Check that the printer power is on. Then open the Ink Tank Cover.
Check the following items for each ink. Then, if necessary, perform Nozzle Check.- Is there ink remaining in the tank?
- Is the ink tank attached properly?
If the Ink Lamp is not lit, remove it and attach it again. - Did you install the ink tanks in their correct positions?
Print a nozzle check pattern
Click Yes.
Printing of the nozzle check pattern begins.Check the print result
Check the print result.
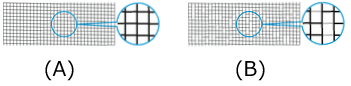
(A) As long as the horizontal lines are in line, and not missing, the nozzle is working normally.
(B) Where the horizontal lines are not in line or are missing, the color nozzle is blocked.From the nozzle check pattern printing results, if it becomes patchy or there are areas that cannot be printed, clean the print heads from Cleaning.
 Note
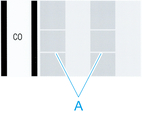
Note- Because Chroma Optimizer (CO) ink is colorless, it is printed over a black ink pattern. Check whether the Chroma Optimizer (CO) ink pattern contains horizontal streaks (A) in the dark gray area.
- From the nozzle check pattern printing results, if it becomes patchy or there are areas that cannot be printed, use Cleaning to clean the print heads.
- Because Chroma Optimizer (CO) ink is colorless, it is printed over a black ink pattern. Check whether the Chroma Optimizer (CO) ink pattern contains horizontal streaks (A) in the dark gray area.
