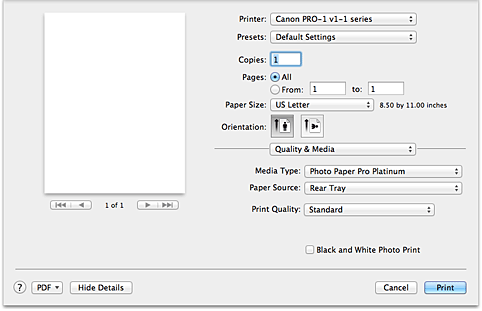

This dialog allows you to create a basic print setup in accordance with the paper type. Unless special printing is required, normal printing can be performed just by setting the items in this dialog.

Select the type of media to be used.
You must select the type of media actually loaded in the printer.
This selection enables the printer to carry out printing properly for the material of the media used.
Select the source from which paper is supplied.
Paper is supplied from the manual feed tray in the back.
Paper is fed from the rear tray.
Select the one that is closest to the original document type and the purpose.
When one of the radio buttons is selected, the appropriate quality will be set automatically.
Gives priority to print quality over printing speed.
Prints with average speed and quality.
Gives priority to printing speed over print quality and a halftoning method separately.
Select this radio button to specify a quality and a halftoning method separately.
Selecting Custom in the Print Quality allows you to adjust the print quality level.
Dragging the slider to the right enhances the print quality while dragging the slider to the left increases the printing speed.
Selecting Custom in the Print Quality allows you to change the halftoning method.
Select the method you want to use.
Select this method to arrange dots in a fixed pattern to produce halftones. This is suitable for printing graphics that require clear boundaries between colors.
Select this method to arrange dots randomly to produce halftones. This is suitable for printing photos or graphics that require fine gradation.
Set black and white photo printing.
Black and white photo printing refers to the function of converting your document to grayscale data in the printer to print it in monochrome.
When you check the check box, both monochrome and color documents will be printed in monochrome.
When printing a color document, be sure to uncheck the check box.
Page top
|