
Color Options
This dialog allows you to adjust the print color as you like. If the color of the printed image is not as expected, adjust the properties in the dialog and retry printing.
The adjustments made here do not affect the colors of the original print data unlike application software dedicated to image processing. Use this dialog just to make fine adjustments.
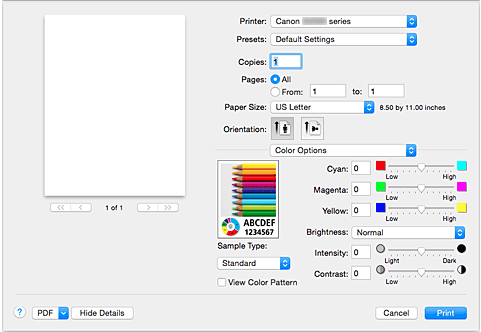
- Preview
-
Shows the effect of color adjustment.
As you adjust each item, the effects are reflected in the color and brightness. - Sample Type
-
Select an image that you want to display as a sample.
If necessary, select one from Standard, Landscape, or Graphics, whichever is most similar to the print results. - View Color Pattern
-
Displays a pattern for checking color changes produced by color adjustment.
When you want to display the sample image with a color pattern, check this check box.
When you want to display the sample image with one that you selected with Sample Type, uncheck this check box. Note
Note- When the Grayscale Printing check box is checked in the Quality & Media, the graphic is displayed in monochrome.
- Color balance (Cyan, Magenta, Yellow)
-
If necessary, adjust the strength of each color. To strengthen a color, drag the slider to the right. To weaken a color, drag the slider to the left.
You can also directly enter a value linked to the slider. Enter a value in the range from -50 to 50.
Adjusting the color balance will result in variations in the balance among the volumes of the individual color inks and hence in the hues of the document as a whole.
Use the printer driver only when adjusting the color balance slightly. To change the color balance significantly, use the application software. - Brightness
-
Select the brightness of printed images.
You cannot change the levels of pure white and black. You can change the contrast of the colors between white and black.
Select from Light, Normal, or Dark, if necessary. - Intensity
-
Select this method to adjust the overall density of your print.
To increase the overall intensity, drag the slider to the right. To decrease the overall intensity, drag the slider to the left.
You can also directly enter a value linked to the slider. Enter a value in the range from -50 to 50. - Contrast
-
The Contrast function changes the differences between light and dark in images during printing.
To make the differences between the light and dark portions of images greater and more distinct, increase the contrast. On the other hand, to make the differences between the light and dark portions of images smaller and less distinct, reduce the contrast.
You can also directly enter a value linked to the slider. Enter a value in the range from -50 to 50.
![]() Important
Important
- When the Grayscale Printing check box is checked for Quality & Media, the color balance (Cyan, Magenta, Yellow) appear grayed out and are unavailable.
- If you select ColorSync for Color Matching, then the color balance (Cyan, Magenta, Yellow), Brightness, Intensity, and Contrast appear grayed out and are unavailable.


