Adjusting Margins
You can adjust margins when printing in a bordered layout or when printing an index.

Items that can be adjusted for margins vary by layout.
 |
 |
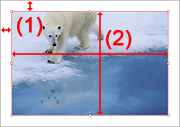
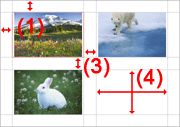
| Bordered (x1) | Other than Bordered (x1) |
- (1) Margins (Top, Bottom, Left and Right)
- (2) Image Size (Height and Width)
- (3) Cell Spacing (Vertical and Horizontal)
- (4) Cell Size (Height and Width)
- Setting Margin Values
- Setting According to the Paper
- Changing Image Size
- Setting Image Position
- Changing Cell Spacing and Cell Size
- Making Margins and Cell Spacing Black
 Important
- When changing Margins or Image Size, set Print Settings and the layout beforehand. When you change Print Settings or layout, Margins and Image Size return to the original settings.
 Note
Note
- When the Bordered (x1) layout is selected, you can set margins by page. When a layout other than Bordered (x1) is selected, the settings apply to all pages.

Setting Margin Values
Set margin values. The image size changes according to the margin values.
-
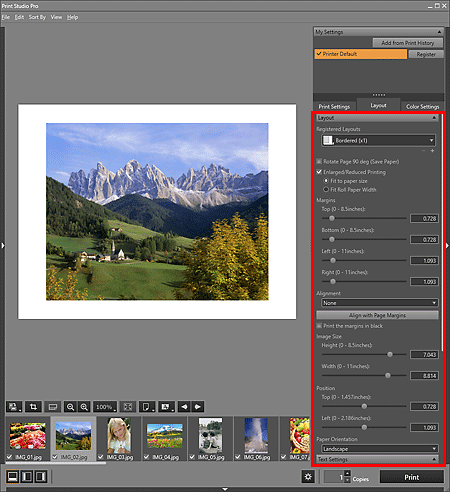
Set the top, bottom, left and right margins in Margins.
Set the margin values by moving the sliders for top, bottom, left and right.
The image size is enlarged or reduced according to the margin values.
 Important
- When a cropping frame is set for the image, the image will be cropped according to the margin values instead of being enlarged or reduced.
 Note
Note- You can also set by entering a value directly into the text input box.
- For Bordered (x1), you can change the margin values by dragging the image in preview directly.
For layouts other than Bordered (x1), you can change the margin values by dragging the gray lines. - The available range of margin values varies depending on the selected paper size.
Setting According to the Paper
You can place an image in the center of the paper or place it with even margins on the left and right.
-
Select an image alignment option from Alignment or click Align with Page Margins.
When Center, Center Horizontally, or Center Vertically is selected from Alignment, the corresponding margins will be set evenly without changing the image size. Once set, the image alignment is retained even if you adjust the margins or image size.
When you click Align with Page Margins, the image will be placed after being enlarged to the maximum size at which it can be printed in a bordered layout.
 Note
Note- The Alignment setting applies to all pages.
- Align with Page Margins can be set only when Alignment is None.
Changing Image Size
For Bordered (x1), change the image size. The margin values change according to the image size.
-
Set the height and width in Image Size.
Set the image size by moving the sliders for height and width. The image is enlarged or reduced to the specified image size.
 Important
- When a cropping frame is set for the image, the image will be cropped to the specified image size instead of being enlarged or reduced.
 Note
Note- You can also change the image size by dragging the red frame in preview.
- You can also set by entering a value directly into the text input box.
Setting Image Position
For Bordered (x1), you can set the image position with the image size retained.
-
Set the image position in Position.
Set the image position by moving the sliders for top and left.
 Note
Note- You can also change the image position by dragging the red frame in preview.
- You can also set by entering a value directly into the text input box.
Changing Cell Spacing and Cell Size
For layouts other than Bordered (x1), change the cell spacing and cell size.
-
Set Cell Spacing or Cell Size.
For Cell Spacing, set by moving the sliders for vertical and horizontal. All cells are enlarged or reduced according to the cell spacing.
For Cell Size, set by moving the sliders for height and width. The spacing between all cells is enlarged or reduced according to the cell size.
 Important
- When a cropping frame is set for the image, the image will be cropped to the specified image size instead of being enlarged or reduced.
 Note
Note- You can also change the cell size by dragging the red frame or gray lines in preview.
- You can also set by entering a value directly into the text input box.
Making Margins and Cell Spacing Black
You can make margins and cell spacing black.
-
Set the margin values and cell spacing.
-
Select the Print the margins in black checkbox.
The margins and cell spacing turn black.
 Important
- When text is entered and the font color is set to black, selecting the Print the margins in black checkbox automatically changes the font color for the header, footer, page numbers and photo information to white.
- If you change Brightness in Color Settings with Black and White Photo selected for Color Mode, the black of the margins may become faint depending on the selected printer.
- Margins may not be printed black up to the edges of the paper depending on the selected media type.
 Note
Note
- To register the changed margin settings, click
 (Add Layout) in the Settings area (Layout).

