Adjusting the Color Balance, Brightness and Contrast
Adjust the color tones of images by specifying the color balance, brightness and contrast.

 Important
- The color balance, brightness and contrast adjustments apply to all the images to be printed. To adjust each image individually, it is recommended that you use image editing software.
- The results of adjustments in Print Studio Pro will only be reflected in the printed materials and not in the image data.
-
Make sure images you want to print are displayed in Thumbnails area at bottom of screen.
-
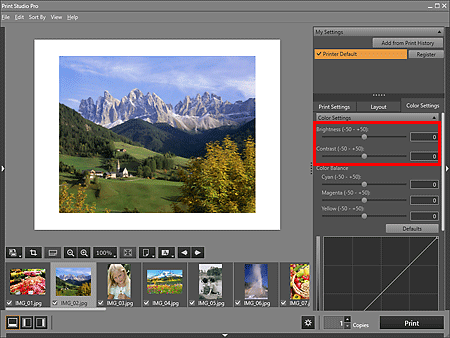
On Color Settings tab, adjust Brightness and Contrast.

 Important
-
If the result of printing after adjusting the brightness/contrast is different from what is displayed in print preview, perform Pattern Print and adjust the color again, using the pattern as a reference.
- When the Print the margins in black checkbox is selected on the Layout tab and Black and White Photo is selected, the result of adjusting Brightness on the Color Settings tab will also be reflected in the printed black border depending on the selected printer.
 Note
Note- For Brightness, move the slider to the right to brighten and left to darken.
- For Contrast, move the slider to the right to increase and left to decrease the contrast.
- You can also set by entering a value directly into the text input box.
-
-
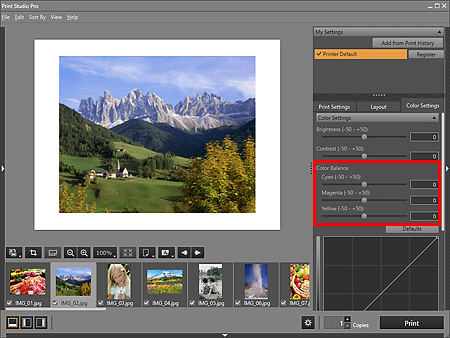
Adjust Color Balance.

 Important
- The color balance cannot be set if Black and White Photo is selected for Color Mode in Color Management on the Print Settings tab. If you select Black and White Photo after changing the color balance, the changed color balance will be discarded.
-
If the result of printing after adjusting the color balance is different from what is displayed in print preview, perform Pattern Print and adjust the color again, using the pattern as a reference.
 Note
Note- Move the slider to the right to emphasize and left to weaken the color tone.
- You can also set by entering a value directly into the text input box.

