
Settings Area (Print Settings)
Set the printer, paper, print quality, etc. to be used for printing.
![]() Note
Note
- The displayed items vary by the printer to be used.
- Available media types, paper sizes and paper sources vary depending on the printer to be used.
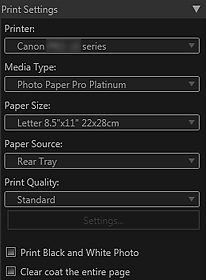
- Printer
- Select the printer to be used.
Among the printers installed on your computer, only printers supporting Print Studio Pro appear in the list. - Media Type
- Select the type of paper to be used.
- Paper Size
- Select the size of the paper to be used.
- Paper Source
- Select the paper source.
- Print Quality
-
Select the print quality from High, Standard, Fast and Custom according to the data to be printed.
- Settings...
-
Select Custom and click this to display the Print Quality Settings dialog box in which you can set the print quality level in more detail.
Move the slider to the right to improve the quality and left to increase the print speed.
 Note
Note- The print quality levels that can be set vary depending on the selected printer and media type.
 Important
- This setting is not available when the Always print in the finest quality setting checkbox is selected in the Advanced Print Settings dialog box.
- Print Black and White Photo
- Select this checkbox to print images in black and white. The preview will also appear in black and white.
- Clear coat the entire page
-
When this checkbox is selected, the Chroma Optimizer (CO) ink will be applied to the entire printable area.
When this checkbox is not selected, it will be applied to the printed areas (except white areas) only.Examples of Areas for Application


Original image When the Clear coat the entire page checkbox is selected When the Clear coat the entire page checkbox is not selected Shaded area: The area to which the Chroma Optimizer (CO) ink is applied
Important- This function may not be available depending on the selected printer and media type.
