Printing a Picture Style (Digital Photo Professional) Pattern
Digital Photo Professional is equipped with Picture Style that allows you to make images closer to what you wanted at the time of shooting by simply selecting a matching style (such as portrait or landscape) when developing/correcting RAW images.
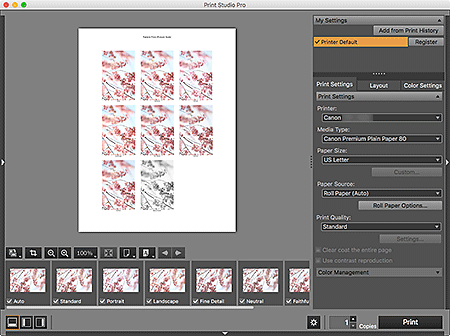
In Print Studio Pro, you can print a pattern of the same image with different Picture Styles applied.
 Important
- This function is available only when using Digital Photo Professional V.4.1.x or later and a RAW image is selected. Refer to the Digital Photo Professional Instruction Manual for the supported operating system environments and image data.
- The results of adjustments in Print Studio Pro will only be reflected in the printed materials and not in the image data.
-
In Digital Photo Professional, select the folder containing the image you want to develop/correct.
-
Select the image you want to develop/correct.
-
From the File menu of Digital Photo Professional, select Plug-in printing > Pattern Print with Print Studio Pro.
-
In the displayed screen, select the Picture Styles with which you want to print a pattern, then click OK.
Print Studio Pro starts.

-
Make sure Picture Styles you want to print are displayed in Thumbnails area at bottom of screen.
 Note
Note- Picture Styles with the checkboxes selected will be printed. Deselect the checkboxes of the Picture Styles you do not want to print.
- Drag to change the order to print.
- You can also change the order to print by selecting an order from the Sort By menu.
-
In Print Settings, set Media Type, Paper Source, Print Quality, etc. according to the printer and paper to be used.
 Note
Note- The paper sizes and media types displayed vary depending on the selected printer.
- Available paper sources and print quality vary depending on the selected printer and media type.
- See "Settings Area (Print Settings)" for details on the Settings area (Print Settings).
-
Click Layout tab, and then select layout you want to use.
 Note
Note- You cannot print the print information with this function.
- See "Settings Area (Layout)" for details on the Settings area (Layout).
-
Load paper.
-
Click Print.
A message appears.
-
Click OK.
The Print dialog appears.
-
Click Print.
The pattern is printed.
Close Print Studio Pro, and then select a Picture Style in Digital Photo Professional.
 Note
Note
- See "Main Screen" for details on the main screen of Print Studio Pro.

