
Settings Area (Layout)
Set the layout.
![]() Note
Note
- When setting the layout, set the printer and paper in the Settings area (Print Settings) beforehand.
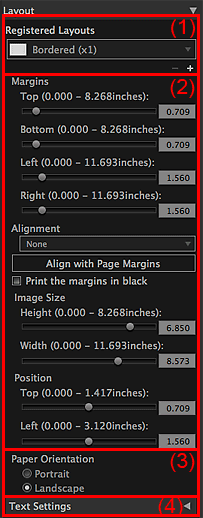
- (1) Layout Selection Area
- (2) Margin Settings Area
- (3) Paper Orientation Selection Area
- (4) Text Settings Area
(1) Layout Selection Area
- Registered Layouts
-
Select a layout.
 Note
Note- The layouts displayed vary depending on the selected media type and paper size.
- When layouts are registered, the registered names appear.
 (Delete Layout)
-
Deletes the selected layout.
Note- You can delete only the layouts you registered.
 (Add Layout)
-
Displays the Add Layout dialog from which you can register the settings made in the Settings area (Layout).
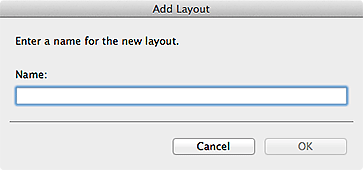
- Name
-
Enter the name of the settings to be registered.
Note- You can enter up to 64 characters.
- You cannot use a name and "Custom" that are already registered.
(2) Margin Settings Area
![]() Note
Note
- Appears only when a bordered layout or an index is selected.
- Page Grid, Cell Spacing and Cell Size appear only when Bordered (x2), Bordered (x4) or Index 5x4 is selected.
- Margins
-
Set the margin values by moving the sliders for top, bottom, left and right or by entering the values directly into the text input box.
Note- The range of margin values varies depending on the media type and paper size.
- Values to be entered into the text input box must be single-byte and with up to six decimal places.
- Alignment
-
Sets even margins. When Center, Center Horizontally, or Center Vertically is selected, the image alignment is retained even if you adjust the margins or image size.
Note- The setting applies to all pages.
- When text is entered, it will also be placed accordingly with the image.
- Align with Page Margins
-
Places the image after enlarging it to the maximum size at which it can be printed in a bordered layout.
Note- Align with Page Margins can be set only when Alignment is None.
- Print the margins in black
-
Select this checkbox to print the margins and cell spacing in black.
 Important
- When text is entered and the font color is set to black, selecting the Print the margins in black checkbox automatically changes the font color for the header, footer, page numbers and photo information to white.
- Margins may not be printed black up to the edges of the paper depending on the selected media type.
- Image Size
-
Specify the height and width of the image by moving the sliders for height and width.
You can also set by entering the values.
Note- Appears only for Bordered (x1).
- The range of image sizes varies depending on the media type and paper size.
- Position
-
Specify the position with the image size retained by moving the sliders for top and left.
You can also set by entering the values.
Note- Appears only for Bordered (x1).
- Page Grid
-
Set the number of rows and columns on the page by moving the sliders for rows and columns.
You can also set by entering the values.
Note- You can set up to 10 rows and 10 columns.
- Cell Spacing
-
Set the cell spacing by moving the sliders for the vertical and horizontal.
You can also set by entering the values.
- Cell Size
-
Set the cell size by moving the sliders for height and width.
You can also set by entering the values.
(3) Paper Orientation Selection Area
- Paper Orientation
- Select vertical or horizontal.
(4) Text Settings Area
Click  (Triangle) to display Text Settings.
![]() Note
Note
- Print header, Print footer, Print page number and Print photo information can be set only when a bordered layout or index is selected.
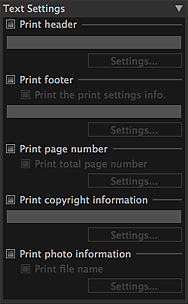
- Print header
- Select this checkbox and enter the text you want to print; the text will be printed at the top of the image.
- Print footer
-
Select this checkbox and enter the text you want to print; the text will be printed at the bottom of the image.
- Print the print settings info.
- Select this checkbox to print the settings in the Settings area (Print Settings).
- Print page number
-
Select this checkbox to print page numbers.
- Print total page number
- Select this checkbox to print the total number of pages.
- Print copyright information
- Select this checkbox and enter the text you want to print; the text will be superimposed and printed on the image.
- Print photo information
-
Select this checkbox to print the photo information.
- Print file name
- Select this checkbox to print the file name of the image.
![]() Note
Note
-
Select the checkbox and click Settings... to display the Text Settings dialog in which you can set text input details such as font and font size.
