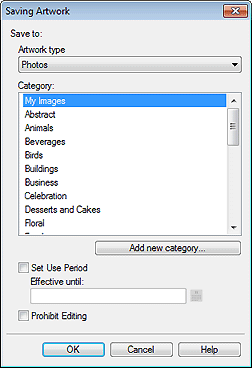
Saving Artwork Dialog Box (Images)
Add photos, clipart, shapes, and other objects.
Display the Saving Artwork dialog box by one of the following operations.
- Click Edit in the task area, select Photos, and then click Add to Photos / Clipart....
- In the task area, select Clipart in Edit, and then click Add to Clipart....
- Right-click an image in the poster design area, and then click Add to Photos / Clipart....

- Artwork type
-
Select the artwork type.
Select Photos or Clipart according to the content of artwork to be added.
Photos: Photos
Clipart: Clipart, shapes, text, and QR codes
- Category
-
From the list, select the category for the artwork to be added.
 Note
Note- My Images and My Clipart are provided as the categories exclusively for users.
- Add new category...
-
Add new categories.
Enter the category name in the displayed dialog box. The category will be added to the bottom of the list.
- Set Use Period
-
Set the usage period for the artwork to be added.
- Effective until
- Click
 (Calendar) to display the Calendar dialog box for specifying the usage period.
 Important
- Once set, the usage period for added artwork cannot be changed or canceled. To change or cancel the usage period, add the template again.
- Prohibit Editing
-
Protect the artwork from being edited.
 Important
- Once set, edit protection cannot be canceled. To edit, add the template again.
 Note
Note-
Once the artwork is added, its thumbnail appears in the list; right-click the thumbnail to check the settings.
- Restrictions Information...:
- Selectable when the image is protected from being edited or when the usage period or a QR code is set.
- Artwork Properties...:
- Displays the Artwork Properties dialog box for checking the artwork information. Artwork added by the user is displayed as User Artwork.
