Importing and Exporting
Import image files such as JPEG images to the library. Imported image files can be used as photos or clipart.
Artwork added to the library can be saved (exported) as a single file. By importing exported artwork to the library on other computers, the created artwork can be shared with other users.

Importing Image Files
Import image files such as JPEG images to the library to use as photos or clipart.
-
In the File menu, click Import....
The Import dialog box appears.
 Note
Note-
File formats of images that can be imported are as follows.
- JPEG (.jpg, .jpeg)
- TIFF (.tif, .tiff)
- PNG (.png)
- BMP (.bmp)
- MF (.?mf)
- SVG (.svg)
-
-
Specify the location of the file.
-
Select the file to import.
-
Click Open.
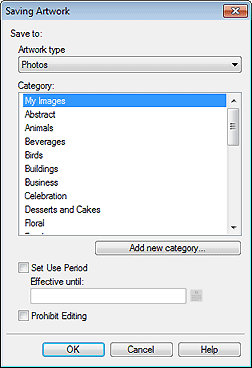
The Saving Artwork dialog box (Images) appears.

-
In Artwork type, select Photos or Clipart.
-
In Category, select a category to import the image to.
 Note
Note-
To add a new category, click Add new category.... Enter the name in Name, and then click OK to add the category to the bottom of the Category list.
You can protect the image from being edited, or set a time limit for its use. For details, see Saving Artwork Dialog Box (Images).
-
-
Click OK.
The image is imported to the library.
Importing Artwork
Import PosterArtist files exported from other computers. The artwork is added to the category specified at the time of export and can be used in the same way as other artwork.
-
In the File menu, click Import....
The Import dialog box appears.
 Note
Note-
When importing PosterArtist files exported from other computers, select the following files.
- .cpt
- .cptx
-
-
Specify the location of the file.
-
Select the file to import.
-
Click Open.
The artwork is imported.
Exporting Artwork
Export artwork as a single file.
 Note
Note
- An export file can include templates in the library, images used in templates, as well as photos, clipart, and backgrounds in the library.
- Artwork can be exported and uploaded to cloud storage. For details, see Using Cloud.
-
Add created artwork to the library.
-
In the File menu, click Export....
The Export dialog box appears.
-
Click the tab of the library containing the artwork you want to export.
-
Select the artwork you want to export, and then click Add.
The selected artwork is added to Item to be exported.
 Note
Note-
Up to 200 artwork items can be selected from multiple libraries.
-
Multiple artwork items are exported as a single file.
-
You can change the thumbnail size. For details, see Export Dialog Box.
-
-
Click Next.
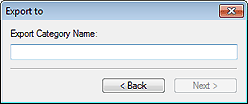
The Export to dialog box appears.

-
Enter the destination category name.
 Note
Note-
Even if artwork is selected from multiple libraries, only one category name can be entered. A category of the same name is created in the corresponding libraries at the destination.
-
-
Click Next.
The Save As dialog box appears.
-
Specify the save location.
-
In File name, enter the file name.
-
Click Save As.
A PosterArtist export file (file extension ".cptx") is saved.
 Note
Note-
For templates, images inserted by users, image retouching information, etc. are also exported.
-
 Important
- Files exported from PosterArtist V3.0 or later cannot be imported in earlier versions of PosterArtist.

