
Cut Out
Use the Cut Out function to isolate the area you want to keep in a photo and discard the rest such as the background.
You can cut out images automatically or manually. Even though the results of automatic cut-outs are sufficiently attractive, you can also manually specify the exact details of what you want to cut out.

-
In the Retouch Image dialog box, click Cut Out.
The Cut Out dialog box appears.
-
On the Auto tab, click Auto.
The background is automatically erased.
 Note
Note- Alternatively, move the mouse pointer over the image to display a crosshair pointer, and then drag the cursor around the area to retain.
- To blur the edges of cut out portions, select the Blur edge checkbox.
-
To adjust the extent of the area to retain, change the value in Tolerance, and then click Auto again.
To erase a larger area, select a smaller value (because fewer colors are judged similar).
To retain a larger area, select a larger value (because more colors are judged similar).
Note-
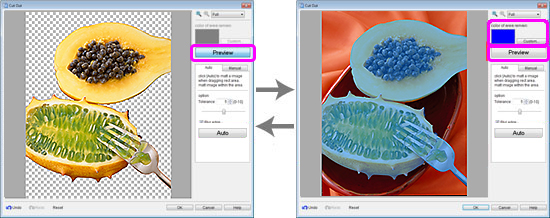
To view the original image that has not been cut out, click Preview. Preview is canceled and the area to be cut out is shaded in the color displayed in color of area remain (indicated in blue in the figure below). Adjust the settings as you compare the original image and the cut out image by clicking Preview.
-
-
Repeat step 3 to specify the area to retain, and then click OK.
The image is cut out.
If automatic cut-out is unsatisfactory - if unneeded portions remain in the cut out image or if too much is erased - try using the tools on the Manual tab.
-
Click the Manual tab.
-
Use the cut-out tools to specify the area to retain and the area to erase in great detail.
Note- It may be easier to work with the tools on the Manual tab if you enlarge the view by clicking
 (Zoom In).
 - For details on the cut-out tools, see Cut Out Dialog Box.
- It may be easier to work with the tools on the Manual tab if you enlarge the view by clicking
-
Click OK.
The image is cut out.
Note- If it is easier to specify the area to erase than to specify the area to retain, specify the area to erase instead. On the Manual tab, click Invert Selection to switch the area to erase and area to retain.
