
Changing the WPA/WPA2 Detailed Settings
![]() Note
Note
-
This screen is not available depending on the printer you are using.
To change the wireless network settings of the printer, connect the printer and the computer with a USB cable temporarily. If you modify the wireless network settings of the computer over wireless connection without USB connection, your computer may not be able to communicate with the machine after modifying the settings.
The example screenshots in this section refer to the WPA detailed settings.
-
Select the printer in Printers:.
When the printer is connected to the computer with a USB cable temporarily, select the printer with USB appearing in the Connected to column.
-
Click the Configuration... button.
-
Click the Wireless LAN button.
-
Select Use WPA/WPA2 in Encryption Method: and click Configuration....
-
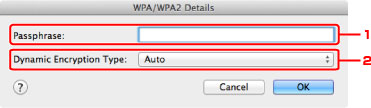
Enter the passphrase, then click OK.
-
Passphrase:
Enter the passphrase set to the access point. The passphrase should be a string of 8 to 63 alphanumeric characters or a 64-digit hexadecimal value.
If you do not know the access point passphrase, refer to the instruction manual provided with the access point or contact its manufacturer.
-
Dynamic Encryption Type:
The dynamic encryption method is selected from either TKIP (basic encryption) or AES (secure encryption) automatically.
 Important
-
If Auto is not displayed on Dynamic Encryption Type:, select either TKIP(Basic Encryption) or AES(Secure Encryption).
-
If the printer cannot communicate with the computer after the encryption type of the printer was switched, make sure that encryption types for the computer and the access point match that set to the printer.
 Note
Note-
This machine supports WPA/WPA2-PSK (WPA/WPA2-Personal) and WPA2-PSK (WPA2-Personal).
-
