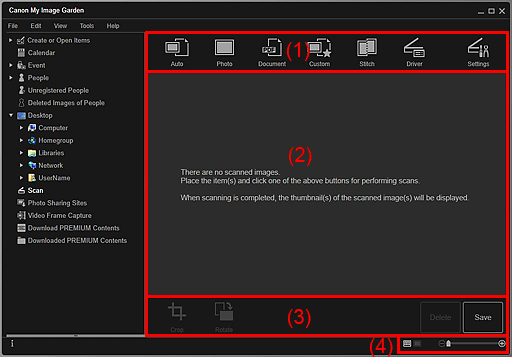
Scan View
You can perform various scans according to item and use.
Click Scan in Global Menu on the left side of the screen to switch to the Scan view.

- (1) Scan Buttons Area
- (2) Scanned Image Thumbnails Area
- (3) Operation Buttons
- (4) Display Size Setting Bar
(1) Scan Buttons Area
 Auto
Auto- Allows you to scan easily by automatically detecting the types of placed items.
 Photo
Photo- Scans placed items as photos.
 Document
- Scans placed items as documents.
 Custom
- Scans with the settings specified as favorite.
 Stitch
-
Combines scanned images into one image.
Click to start IJ Scan Utility.
For details, see the "Scanning Items Larger than the Platen (Image Stitch)" page by searching for it from the top page of the Online Manual for your model.
 Driver
-
Opens ScanGear (scanner driver) from which you can scan photos and documents with advanced settings.
Click to start ScanGear.
For details, see the "Scanning Using Application Software (ScanGear)" page by searching for it from the top page of the Online Manual for your model.
 Settings
-
You can make advanced scan settings.
Click to start IJ Scan Utility.
For details, see the "Settings Dialog Box" page by searching for it from the top page of the Online Manual for your model.
(2) Scanned Image Thumbnails Area
Displays the thumbnails and file names of the scanned images.
(3) Operation Buttons
 Note
Note
 (Previous File/Next File) appears only in the details view.
- Delete and Save appear only in the thumbnail view.
 Crop
Crop- Switches to the Crop view in which you can crop scanned images.
 Rotate
- Rotates the scanned image 90 degrees clockwise with each click.
- Delete
- You can delete scanned images.
- Save
- Displays the Save dialog box from which you can save the scanned images.
 (Previous File/Next File)
- Switches the displayed image when there are multiple scanned images.
(4) Display Size Setting Bar
 (Thumbnail View)
- Switches the view to the thumbnails of images.
 (Details View)
- Switches the view to preview the image.
 (Whole Image View)
- While in the details view, fits the preview to the area size.
 (Reduce/Enlarge)
- Click
 (Reduce) or
  (Enlarge) to reduce or enlarge the display size. You can also freely change the display size by dragging the slider.

