Adding Text
In the Item edit screen, you can add text to cards, collages, disc labels (CD/DVD/BD), and other items containing a text box.
 Important
- This function may not be available depending on the type and design of your item.
 Note
Note
- Refer to "Item Edit Screen" for how to switch to the Item edit screen.
- You can also add text boxes. Refer to "Adding/Adjusting Text Boxes" for details.
- Collage editing is used as an example in the following descriptions. Available settings may vary depending on what you create.
-
In the Item edit screen, click a text box in your item.
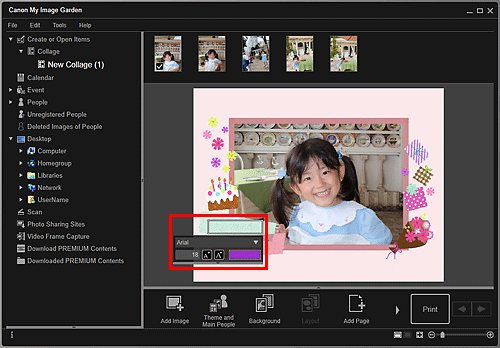
The text input palette appears below the text box.

-
Enter text in the text box.
-
Use the text input palette to change the font type, font size, font color, and text position.

- (1) Font
- Select the font type.
- (2) Size
-
You can set the font size within the range of 5 to 100 points.
 (Decrease Size)
- Decreases the font size by 1 point each time it is clicked.
 (Increase Size)
- Increases the font size by 1 point each time it is clicked.
- (3) Color
-
You can select the font color.
 (Color Setting)
- Click to display the Color dialog box. Select the color you want to set.
- (4) Text Alignment
-
You can set how you want to align text.
 Note
Note- For vertical text boxes, you can select align top, align middle, or align bottom.
For text alignment, you can select align left, align center, or align right.
- (5) Font Style
-
You can set the font style.
For font style, you can select bold, italic, outline, or shadow.
You can also set multiple font styles.
 Note
Note- Click the bar at the bottom of the text input palette to show or hide Text Alignment and Font Style.
- Available font styles vary depending on the selected font.
-
Click outside the text box.
The entered text is reflected in the item.

