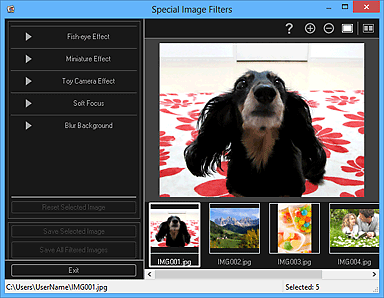


You can enhance an image to resemble a photo taken with a fish-eye lens.

Select the image(s) you want to enhance.
Click Special Filters at the bottom of the screen.
The Special Image Filters window appears.

Select the image you want to enhance from the Selected Images area.
The selected image appears in the Preview area.
 Note
NoteIf only one image is selected, only the preview appears and the Selected Images area does not appear.
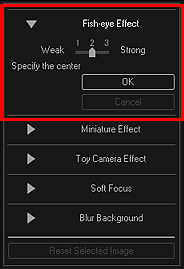
Click Fish-eye Effect.

The  (Center) mark for setting the center position appears in the Preview area.
 Note
NoteIf the  (Center) mark does not appear, move the cursor over the Preview area.
The effect level can be changed by moving the slider displayed below Fish-eye Effect.
Drag the  (Center) mark to set the center position, then click OK.

The edges of the image are distorted, focusing on the specified area, and the  (Enhancement) mark appears on the upper left of the image.
 Note
NoteClick  (Display Comparison Screen) to display the images before and after the enhancement side by side in a separate window so that you can compare and check the result.
Click Cancel to undo the enhancement. Enhancements made with other functions are retained.
Click Save Selected Image or Save All Filtered Images.
Enhanced image(s) is (are) saved as a new file(s).
 Note
NoteTo save only the image(s) you like, select it (them) and click Save Selected Image. Click Save All Filtered Images to save all the enhanced images at one time.
The enhanced image(s) can be saved in JPEG/Exif format only.
Click Exit.
 Important
If the enhanced image(s) is (are) not saved, the enhancement(s) will be deleted.
Page top |