
Unregistered People View
You can register names to the images whose face areas have been automatically detected.
Click Unregistered People in Global Menu on the left side of the screen to switch to the Unregistered People view.
![]() Note
Note
- Identifying people appears instead of Unregistered People during image analysis.
- Image analysis only applies to JPEG, TIFF, and PNG image files saved in the folders set to be subject to image analysis, or their subfolders. Refer to "Image Analysis Settings Tab" for how to set folders that are subject to image analysis.
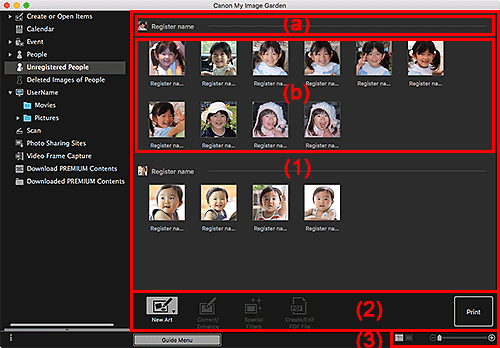
-
- (a) Representative Thumbnail Area
- (b) Thumbnails Area
- (2) Operation Buttons
- (3) Display Size Setting Bar
(1) Group by Person Area
Displays groups of images identified as those of the same person.
![]() Note
Note
- To change the display order of groups, control-click within the area and select Sort (By People) from the displayed menu, then click In Saved Order or In Order of Frequency.
- (a) Representative Thumbnail Area
-
Displays the thumbnail of the face area in the first identified image among the images identified as those of the same person.
Click Register name and enter a name to register the name to images in the Thumbnails area that are identified as those of the same person, at once.
 Note
Note- Drag and drop the thumbnail to Deleted Images of People in Global Menu on the left side of the screen to move the images identified as those of the same person to the Deleted Images of People view, at once.
- Drag and drop the thumbnail to another person's group to collect the images identified as those of the same person into the target person's group, at once.
- (b) Thumbnails Area
-
Displays the thumbnails of face areas in images identified as those of the same person, in a group.
Click Register name and enter a name to register the person's name image by image.
Note- When you select Delete from the menu displayed by control-clicking a thumbnail, the image will be deleted from the Unregistered People view. Deleted images move to the Deleted Images of People view.
- You can also drag and drop a thumbnail to Deleted Images of People in Global Menu on the left side of the screen.
- You can also merge a thumbnail with another person's group by dragging and dropping it.
(2) Operation Buttons
![]() Note
Note
- New Art and Create/Edit PDF File appear only in the thumbnail view.
- Specify Person and
 (Previous File/Next File) appear only in the details view.
 - Correct/Enhance, Special Filters, and Create/Edit PDF File can be clicked only when an image is selected.
 New Art
-
You can create items such as collages and cards using images.
Select an item to create to display the Set Design and Paper dialog in which you can set the design, etc. of the item to create.
The view switches to the Item edit screen when setting is completed.
 Correct/Enhance
- Displays the Correct/Enhance Images window in which you can correct or enhance images.
 Special Filters
- Displays the Special Image Filters window in which you can enhance images with special filters.
 Create/Edit PDF File
- Displays the Create/Edit PDF File view in which you can create PDF files.
 Specify Person
- Displays a white frame in preview with which you can specify the face area of a person and register the name.
- Displays the Print Settings dialog or Print dialog for printing images.
- (Previous File/Next File)
- Switches the displayed image when multiple images are detected.
(3) Display Size Setting Bar
 (Thumbnail View)
- Switches the view to the thumbnails of images.
 (Details View)
- Switches the view to preview the image.
 (Whole Image View)
- While in the details view, fits the preview to the area size.
 (Reduce/Enlarge)
- Click
 (Reduce) or
  (Enlarge) to reduce or enlarge the display size. You can also freely change the display size by dragging the slider.
