
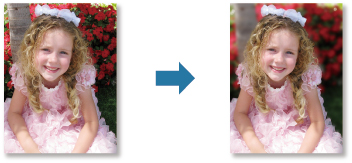
Blurring the Background
You can blur the background to emphasize the subject or specific areas.
![]() Note
Note
- Areas may not be specified as intended depending on how you surround them.
- This filter is suitable for photos in which the subject is clearly distinguished from the background.
-
Select the image(s) you want to enhance.
-
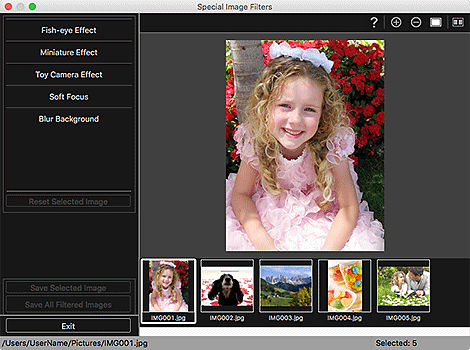
Select (an) image(s), then click Special Filters at the bottom of the screen.
The Special Image Filters window appears.
-
Select the image you want to enhance from the Selected Images area.
The selected image appears in the Preview area.
 Note
Note- If only one image is selected, only the preview appears and the Selected Images area does not appear.
-
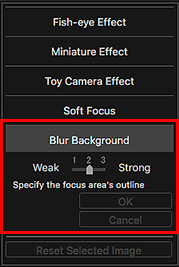
Click Blur Background.
 Note
Note- The effect level can be changed by moving the slider displayed below Blur Background.
- When the cursor is moved over the Preview area, the shape of the cursor changes to
 (Pen).
-
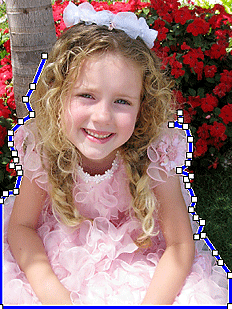
Specify the focus area (area that will not be blurred) with a line by clicking along its outline.
 Note
Note-
You can select whether to detect the outline automatically, by clicking
 (Detect the Outline and Select the Area) on the Toolbar. When the "Detect the outline and select the area" mode is selected, the outline near the cursor is automatically detected, enabling you to specify the area along the outline.
Specify the area while pressing the shift key to temporarily cancel the "Detect the outline and select the area" mode.
- When the "Detect the outline and select the area" mode is canceled, a clicked point and the next clicked point will be connected with a straight line.
- Press the delete key to undo the specified points one at a time.
-
-
When you finish surrounding the area, click the first point.
When you place the cursor over the first point, the cursor changes to
 (Start Point of Area). When you click it, the first and last points are connected and the focus area is specified.
 Important
- You can specify up to 30 areas.
Note- Double-click the last point to connect the first and last points automatically.
- Click
 (Cancel the Selected Area) to delete the specified area.
 -
To edit the specified area, perform the operations below.
Moving a point: Drag the point to the target position
Adding a point: Place the cursor over the line of the specified area; when the cursor changes to
 (Add a Point), drag it to the target position
Deleting a point: Drag the point to a point next to it, where the cursor changes to
 (Delete a Point)
 - When an area is created within a created area, the inner area will also be blurred.
-
Click OK.
The background outside the specified area(s) is blurred, and the
 (Enhancement) mark appears on the upper left of the image.Note
- Click
 (Display Comparison Screen) to display the images before and after the enhancement side by side in a separate window so that you can compare and check the result.
 - Click Cancel to undo the enhancement. Enhancements made with other functions are retained.
- Click
-
Click Save Selected Image or Save All Filtered Images.
Enhanced image(s) is (are) saved as a new file(s).
Note- To save only the image(s) you like, select it (them) and click Save Selected Image. Click Save All Filtered Images to save all the enhanced images at one time.
- The enhanced image(s) can be saved in JPEG/Exif format only.
-
Click Exit.
Important- If the enhanced image(s) is (are) not saved, the enhancement(s) will be deleted.
