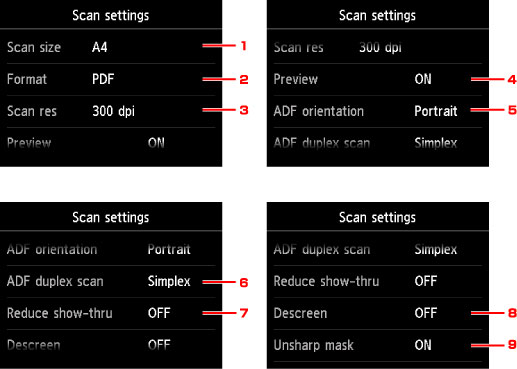
Setting Items for Scanning Using the Operation Panel of the Machine
You can change the scan settings such as the scan size, resolution, or data format.
When the Scan standby screen is displayed, tap Settings to select the setting item. Flick to display setting items, then tap the setting item to display the settings. Tap to specify the setting.
 Note
Note
-
When you forward the scanned data to the computer using WSD (one of the network protocols supported in Windows 8.1, Windows 8, Windows 7, and Windows Vista), you cannot specify the scan setting.
-
Depending on the destination, some setting items cannot be selected. This section describes the setting items when you select USB flash drive on the screen for selecting to which you save the data.
The setting item which cannot be selected is displayed grayed out.
-
Some settings cannot be specified in combination with the setting of other setting item, the document type selected for Doc.type, or the scan menu on the screen for selecting to which you save the data. If the setting which cannot be specified in combination is selected,
 and Error details are displayed on the touch screen. In this case, tap
  on the upper left on the touch screen to confirm the message, then change the setting.
 -
The specified scan settings other than ADF orientation and ADF duplex scan such as the scan size, resolution, and data format are retained even if the machine is turned off.
-
When scanning starts in the scan menu that is not available with the specified setting, The specified function is not available with current settings. is displayed on the touch screen. Change the setting, following the on-screen instructions.
-
When you forward the scanned data to the computer or attach the data to an e-mail, you can specify the destination and file name using Canon IJ Scan Utility.
-
If you scan originals from the computer, you can scan with advanced settings. For details on scanning from the computer:

-
Scan size
Select the size of the original.
-
Format
Select the data format of the scanned data.
-
Scan res (Scan resolution)
Select the resolution for scanning.
-
Preview
Select to preview the scanned data or not when saving the data on a USB flash drive.
-
ADF orientation
Select the orientation of the original document.
This setting item is not available when Photo is selected for Doc.type.
-
ADF duplex scan
Select the scanning method when using ADF. When you select Duplex, tap Advanced to select the stapling side.
This setting item is not available when Photo is selected for Doc.type.
-
Reduce show-thru (Reducing show-through)
Characters on the back may show through when scanning a thin document such as a newspaper. Select ON if characters seem to show through on the scanned document.
This setting item is not available when Photo is selected for Doc.type.
-
Descreen
A printout consists of minute dots to make characters or graphs. Interfering with each dot may result in uneven shades or a striped pattern. Select ON if you notice any uneven shades or a striped pattern on the scanned image.
This setting item is not available when Photo is selected for Doc.type.
 Note
Note-
Even if ON is selected for this setting, some moire effects may remain if Unsharp mask is set to ON. In that case, select OFF for Unsharp mask.
-
-
Unsharp mask
The outline of small characters or thin objects such as a hair or leaves on a photo can be accentuated. Select ON if you want to accentuate the outline of the scanned data.


