
Make sure that the power is turned on, then, holding both sides of the paper output tray, gently open it.
Open the document cover, then open the ink cover.
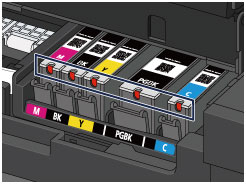
Check the ink lamp.
Close the ink cover after checking the ink lamp status.
 The ink lamp is on.
The ink tank is correctly installed.
The ink lamp is flashing.
Flashing slowly (at around 3-second intervals)
 ...... Repeats
Ink tank is running low. Prepare a new ink tank.
Flashing fast (at around 1-second intervals)
 ...... Repeats
- The ink tank is installed in the wrong position.
Or
- The ink has run out.
Make sure that the ink tank is installed in the correct position as indicated by the label on the print head holder. If the position is correct but the lamp flashes, there has been an error and the machine cannot print. Check the error message displayed on the LCD.
The ink lamp is off.
The ink tank is not installed properly or the function for detecting the remaining ink level is disabled. If the ink tank is not firmly in place, make sure that the orange protective cap has been removed from the bottom of the ink tank, then press on the top of the ink tank until the ink tank clicks into place.
If the ink lamp is still off after reinstalling the ink tank, there has been an error and the machine cannot print. Check the error message displayed on the LCD.
 Note Note
|
Page top |

