
Registering the Printer
Follow the procedure below to register the printer as a Bluetooth device.
-
Select System Preferences from the Apple menu.
-
Click Print & Scan.
In Mac OS X v10.6.8, click Print & Fax.
-
Click the + button.
-
Select the device name of the printer.
-
In Mac OS X v10.8:
-
Select the device name of the printer from the Add dialog.
If the Add dialog is not displayed, click the + button, then click Add Printer or Scanner. The Add dialog is displayed.
-
Select the device name of the printer with bluetooth on Kind.
-
-
In Mac OS X v10.7:
-
Select the device name of the printer from the Add Printer dialog.
If the Add Printer dialog is not displayed, click the + button, then click Add Other Printer or Scanner. The Add Printer dialog is displayed.
-
Select the device name of the printer with bluetooth on Kind.
-
-
In Mac OS X v10.6.8:
-
Select the device name of the printer from Add Printer dialog.
-
Select the device name of the printer with bluetooth on Kind.
-
-
-
Click Add.
![]() Note
Note
-
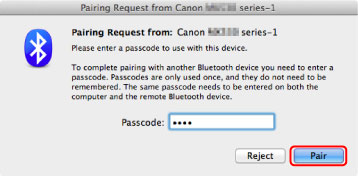
If you set a passkey on the printer, input the passkey (passcode) set on the Passkey Screen and click Pair.
For more information about a passkey, see Bluetooth settings Screen.
-
If multiple printers are registered with the same name, leave one printer and delete all the rest.
-
To set the newly registered printer as the default printer when multiple printers are registered, select the printer in Default Printer. The printer will be selected when you open the Print dialog.
Now, the settings for printing via Bluetooth communication are ready.
