
Printing Photo from a Memory Card onto the Disc Label
You can print a photograph saved on a memory card onto the disc label of the printable disc.
![]() Important
Important
-
You cannot print on 3.15 inches / 8 cm printable discs.
-
Do not attach the disc tray or place the printable disc until the message asking you to set them is displayed. Doing so can damage the machine.
-
Flick the HOME screen, then tap
 Advanced print.
 -
Insert the memory card into the card slot.
 Note
Note-
If you insert the memory card before you select Advanced print on the HOME screen, the photo selection screen in Photo is displayed.
If both photo files and PDF files are saved on the memory card, the confirmation screen to select which file you print is displayed.
To display the HOME screen, touch the HOME button.
-
-
Tap Print photos to disc label.
The print area setting screen is displayed.
Note-
If no printable photo data is saved on the memory card, Data of supported types are not saved. is displayed on the touch screen.
-
If more than 2,000 photo data are saved on the memory card, the photo data is split by group per 2,000 photos in reverse chronological order (date last modified) automatically. Check the message displayed on the touch screen, then tap OK.
-
-
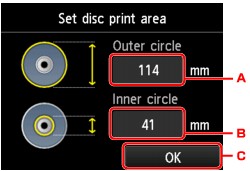
Specify the print area.
-
Tap to specify the outer circle.
-
Tap to specify the inner circle.
-
Tap to finalize to specify the print area.
Note-
Measure the outer and inner diameters of the printing surface of the printable disc and make sure you set a value smaller than the measured value for the outer diameter, and a value larger than the measured value for the inner diameter.
-
For information on printable discs, contact their manufacturers.
-
-
Tap a printable disc type.
Note-
If your printable disc is the recommended disc, specify Recommended disc for the suitable density printing. If not, specify Other disc.
-
-
Tap the photo you want to print.
Note-
Other options
-
-
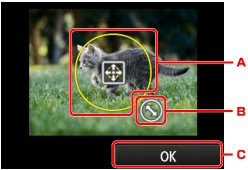
Specify the print area with trimming.
-
Drag to position the trimming frame.
-
Drag to set the trimming frame size.
-
Tap to finalize your selection of trimming area.
When the area to be cropped is specified, the print setting confirmation screen is displayed.
-
-
Check the print settings, then touch the Color button.
-
Follow the on-screen instructions to set the printable disc.
Note-
You can see the procedure to set the printable disc by tapping How to set. The next screen is displayed by tapping Next. Additionally, touching the Stop button returns to the print confirmation screen.
-
For details on how to set the printable disc:
-
-
Tap OK.
The machine starts printing.
Note-
Touch the Stop button to cancel printing.
-
After printing, allow the printing surface of the disc to dry naturally. Do not use hairdryers or expose the disc to direct sunlight to dry the ink. Do not touch the printing surface until the ink has dried.
-
To keep the print quality at an optimal level, it is recommended to stop printing discs once every ten discs when printing more than ten discs continuously. To stop the printing operation, detach the disc tray from the machine, then close the disc tray guide. After approximately three minutes have elapsed, open the disc tray guide, attach the disc tray to the machine, then resume printing.
-
If printing is misaligned, adjust the printing position using Adjust disc print area in Print settings under Device settings.
-
