
Saving a Document in Machine's Memory to USB Flash Drive
You can save the received faxes stored in the machine's memory to the USB flash drive as PDF files using the operation panel of the machine.
You can save a specified document in the machine's memory to the USB flash drive or save all the documents in its memory to the USB flash drive at a time.
![]() Important
Important
-
Do not remove the USB flash drive from the machine until saving is complete.
-
For safety reasons, we recommend backing up faxes saved on a USB flash drive to another media periodically to avoid unexpected accidents.
-
We assume no responsibility for damage to or loss of data for whatever reason even within the warranty period.
![]() Note
Note
-
When saving a specified document, you specify it by its transaction number. If you do not know the transaction number for your target document, print the list of documents (MEMORY LIST) first.
-
After saving the fax in the machine's memory to the USB flash drive, the fax is still stored in the machine's memory.
For details on how to delete the fax in the machine's memory, see Deleting a Document in Machine's Memory.
-
Select
 FAX on the HOME screen.
The Fax standby screen is displayed.
-
Use the


 button to select Function list, then press the OK button.
The Function list screen is displayed.
-
Use the
button to select Memory reference, then press the OK button. Note
Note-
If no document is stored in the machine's memory, There is no document in memory. is displayed. Press the OK button to return to the previous screen.
-
-
Use the
button to select a save menu, then press the OK button.-
To specify a document to save on the USB flash drive:
If you select Save specified document, you can specify the document to save on the USB flash drive.
When the Specify the storage medium screen is displayed, select USB flash drive and press the OK button. The document selection screen is displayed.
Note-
If the specified document is not stored in the machine's memory, There is no document that can be saved. is displayed. Press the OK button to return to the previous screen.
-
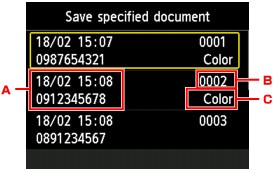
Date and time of transaction and fax/telephone number
-
Transaction number (TX/RX NO.)
A transaction number from "0001" to "4999" indicates a document being sent.
A transaction number from "5001" to "9999" indicates a document being received.
-
Color information
Color is displayed for color transmission/reception. Nothing is displayed for black & white transmission/reception.
After selecting the document to save and pressing the OK button, the specified document is saved on the USB flash drive.
-
-
To save all the received documents stored in the machine's memory on the USB flash drive:
If you select Save all RX documents, you can save all documents on the USB flash drive.
When the confirmation screen is displayed, select Yes and press the OK button.
When the Specify the storage medium screen is displayed, select USB flash drive and press the OK button. All documents are saved on the USB flash drive.
-
![]() Note
Note
-
You can save up to 250 pages of fax as one PDF file.
-
You can save up to 2000 PDF files on a USB flash drive.
-
Faxes are saved according to the order of the transaction number when Save all RX documents is selected.
-
If the USB flash drive is removed or becomes full while saving faxes is in progress, the error message is displayed on the LCD. Press the OK button to dismiss the error.
-
The folder and file name of faxes saved on the USB flash drive is as follows:
-
Folder name: CANON_SC\FAXDOC\0001
-
File name (file extension: PDF): Running numbers, starting from FAX_0001
-
File date: The date and time of saving as set in the machine.
For details on how to set the date and time:
-
