
Aligning the Print Head
If printed ruled lines are misaligned or print results are otherwise unsatisfactory, adjust the print head position.
![]() Note
Note
-
When the ink has run out during printing the nozzle check pattern, the error message will appear on the LCD.
You need to prepare: a sheet of A4 or Letter-sized plain paper (including recycled paper)*
* Be sure to use paper that is white and clean on both sides.
-
Make sure that the power is turned on.
-
Load a sheet of A4 or Letter-sized plain paper in the cassette.
After inserting the cassette into the machine, the paper information registration screen is displayed on the LCD. Select A4 or Letter for Page size and Plain paper for Type, then press the OK button.
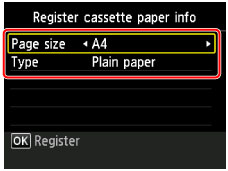
If a message is displayed on the screen, follow the directions in the message to complete registration.
-
Extend the output tray extension, then open the paper output support.
-
Select
 Setup on the HOME screen, then press the OK button.
The setup menu screen will appear.
-
Select
 Maintenance, then press the OK button.
The Maintenance screen will appear.
-
Select Auto head alignment, then press the OK button.
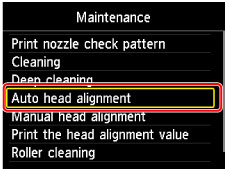
The confirmation screen will appear.
-
Select Yes, then press the OK button.
The print head alignment sheet will be printed and the print head position will be adjusted automatically.
This takes about 3 to 4 minutes.
 Note
Note-
If the automatic adjustment of the print head position has failed, the error message appears on the LCD.
-
-
When the completion message appears, press the OK button.
![]() Note
Note
-
If the print results are still not satisfactory after adjusting the print head position as described above, align the print head manually.
You can also align the print head manually from a computer.
