
Using the Roll Unit In Take-Up Mode
![]() Important
Important
-
For details on the roll paper compatible with winding, see "Paper Information List.".
-
Before loading the roll paper to be taken up on the roll unit, set the roll unit mode to take-up device on the printer touch screen. (See "Switching Roll Unit Modes.")
-
The following operation assumes that the roll holder is not installed on the roll unit and that roll paper is not loaded on the roll holder. If the roll holder is installed on the roll unit, first remove the roll holder from the roll unit, and then remove the roll paper loaded on the roll holder. (See "Removing the Lower Roll from the Roll Unit (Option).") (See "Removing Rolls From the Roll Holder.")
-
Paper winding is possible until the outer diameter of the wound paper is the same as the outer diameter of the holder stopper.
-
Store basket. (See "Storing the Basket.")
-
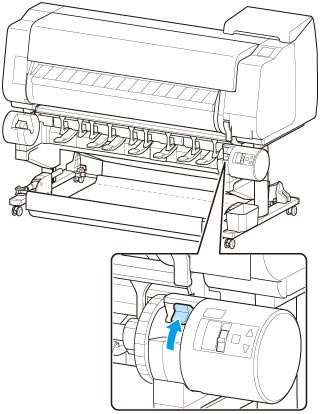
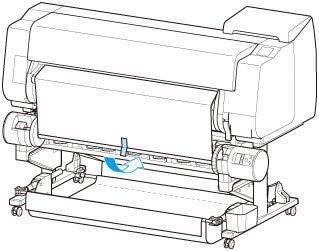
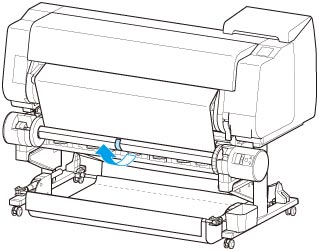
Rotate the holder stopper lever (A) towards
 to release the lock, and while holding it in position (B), remove holder stopper from the roll holder.
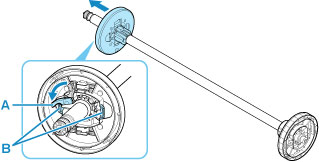
-
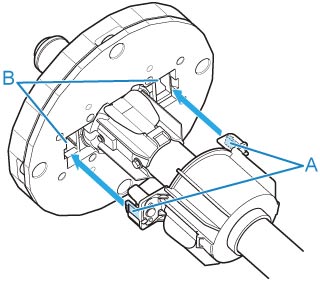
If taking up roll paper whose paper core has an inner diameter of 3 inches (76.2 mm), insert 3-Inch Paper Core Attachment in roll holder and holder stopper.
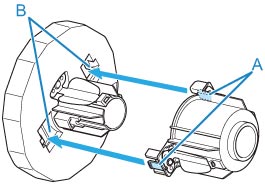
Align the 3-Inch Paper Core Attachment tabs (A) with the holes on the roll holder or holder stopper (B) and insert firmly.
-
roll holder Side
-
holder stopper Side
-
-
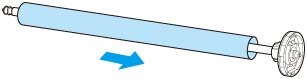
Insert paper core, which is for winding roll paper, into roll holder.
 Important
-
We recommend using a paper core that is wider than the paper to be wound when winding paper. If you use a narrower paper core, use with a gap between the holder stopper and the paper.
-
Always use a paper core for winding that is the same thickness or is thicker than the roll paper's paper core. If you use a paper core that is thinner, it may affect take up.
-
-
Insert holder stopper from left into roll holder as shown, and then while holding in position (B), push firmly until holder stopper flange (A) touches paper core. Lock the holder stopper lever (C) by rotating it towards
 .
.
-
Change Roll Holder Lock switch on roll unit to release direction.
-
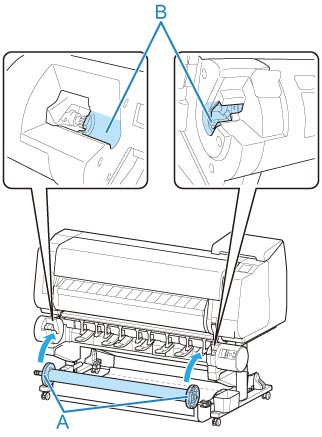
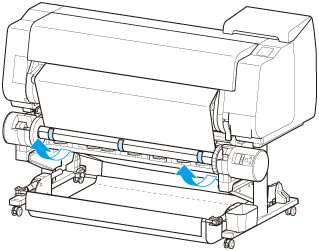
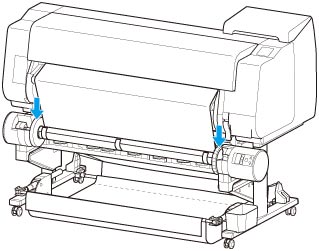
Hold flanges (A) so that holder stopper is on left, align roll holder shaft with roll holder slot left and right guide grooves (B), and load.
-
Change Roll Holder Lock switch on roll unit to lock direction.
-
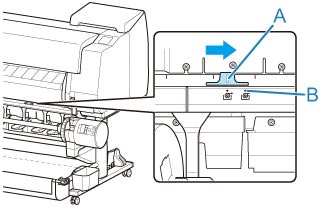
Change the feed flap switch on top of the roll unit so that the switch indicator (A) is aligned with ● (B) position on the take-up icon.
-
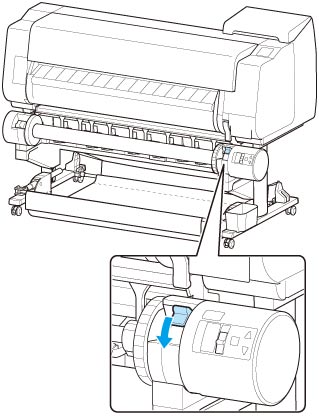
Change Inward/Outward Winding Changeover switch on roll unit to desired winding direction.

 Note
Note-
For the winding direction of the roll paper, you can select either outward winding to make the printed surface on the outside of the roll or inward winding to make the printed surface on the inside of the roll.
-
-
Follow these steps to secure the leading edge of the roll paper to the paper core with tape.
-
If message appears on touch screen to confirm whether or not to advance paper automatically so it can be secured with tape
-
Tap Yes.
The leading edge of the roll paper advances until it is close to the roll unit.
-
Hold center of leading edge of roll paper, align right edge of take-up spool paper core's right edge and tape center to paper core while pulling on roll paper evenly.
-
Outward Winding
-
Inward Winding
Important-
If winding with inward winding, you must pass the leading edge of the roll paper to the back of the paper core and secure with tape. If this operation is difficult, you can also remove the roll holder, push the roll paper into the back, reinstall the roll holder, and pass the roll paper to the back of the paper core.
-
-
Align right edge of roll paper to right edge of paper core while pulling on roll paper evenly, and secure with tape.
-
While making sure that roll paper is flat, secure left edge of roll paper to paper core with tape.
-
Outward Winding

-
Inward Winding
Important-
Secure the left and right edges of the roll paper with tape within 1.97 inches (50 mm) of the edges so that neither end of the roll paper lift up.
-
When rewinding heavyweight paper, use strong adhesive tape to fasten it. Otherwise, a rewinding problem may result.
-
If you use a paper core narrower than the paper to be wound, adjust the position of the holder stopper, so that there is a gap between the holder stopper and the paper.
-
-
Make sure the leading edge of the roll paper is not lifting up from the paper core, and if there are places lifting up, tape in additional places so that the paper does not lift up.
-
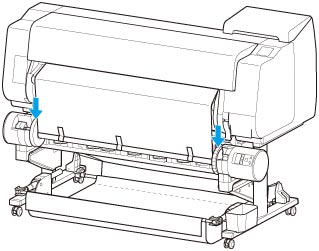
Push roll holder downward, check that roll holder is not lifting up, and tap OK.
-
Outward Winding
-
Inward Winding
Important-
If the roll holder lifts up, it may cause an error.
-
-
To stabilize operations when starting taking up, advance roll paper with operation panel and wind roll paper approximately one revolution. (See "Feeding Roll Paper Manually.")
-
Push roll holder downward again, and check that roll holder is not lifting up.
The winding preparation is complete. When printing to the roll starts, the roll paper can be automatically wound.
-
-
If Ready to print appears on touch screen
-
Manually advance roll paper (See "Feeding Roll Paper Manually.") or start printing, and wait for leading edge of roll paper to reach roll unit.
-
Hold center of leading edge of roll paper, align right edge of take-up spool paper core's right edge and tape center to paper core while pulling on roll paper evenly.
-
Outward Winding
-
Inward Winding
Important-
If winding with inward winding, you must pass the leading edge of the roll paper to the back of the paper core and secure with tape. If this operation is difficult, you can also remove the roll holder, push the roll paper into the back, reinstall the roll holder, and pass the roll paper to the back of the paper core.
-
-
Align right edge of roll paper to right edge of paper core while pulling on roll paper evenly, and secure with tape.
-
While making sure that roll paper is flat, secure left edge of roll paper to paper core with tape.
-
Outward Winding
-
Inward Winding
Important-
Secure the left and right edges of the roll paper with tape within 1.97 inches (50 mm) of the edges so that neither end of the roll paper lift up.
-
When rewinding heavyweight paper, use strong adhesive tape to fasten it. Otherwise, a rewinding problem may result.
-
If you use a paper core narrower than the paper to be wound, adjust the position of the holder stopper, so that there is a gap between the holder stopper and the paper.
-
-
Make sure the leading edge of the roll paper is not lifting up from the paper core, and if there are places lifting up, tape in additional places so that the paper does not lift up.
-
Push roll holder downward and check that roll holder is not lifting up.
-
Outward Winding
-
Inward Winding
Important-
If the roll holder lifts up, it may cause an error.
-
-
Make sure Inward/Outward Winding Changeover switch on roll unit is in desired direction and press Auto Take-up/Pause button.
The Pause lamp, which has been lighted up to this point, turns off, and the Auto Take-up lamp lights up instead.
The winding preparation is complete. During printing, the winding starts. Before printing, the winding starts at the same time as the printing.
Important-
When winding inwardly, loosening of the wound paper can be prevented by pressing the roll paper with the arm. However, doing so may produce pressure traces on the paper. In this case, tap the roll unit area of the media information display area and set Paper retention settings to Release.
-
-
-
