Loading Rolls on the Roll Holder
When printing on roll paper, attach the roll paper to the Roll Holder.
Roll paper comes in two types: 2-inch and 3-inch cores. If using 3-inch core roll paper, attach the 3-Inch Paper Core Attachment to the Roll Holder and holder stopper.
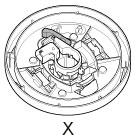
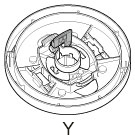
Check whether your holder stopper is Type X or Y.
 Caution
-
Set the roll on its side on a table or other flat surface so that it does not roll or fall. Rolls are heavy, and dropping a roll may cause injury.
 Important
-
When handling the roll, be careful not to soil the printing surface. This may affect the printing quality. We recommend wearing clean cloth gloves when handling rolls to protect the printing surface.
-
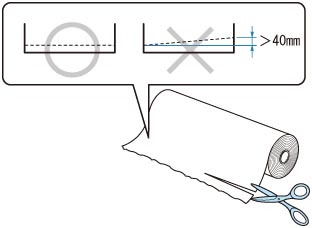
Cut the edge of the roll paper if it is uneven, dirty, or has tape residue. Otherwise, it may cause feeding problems and affect the printing quality. Be careful not to cut through any barcodes printed on the roll.
-
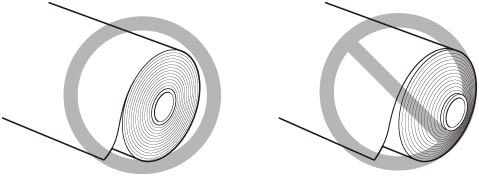
Align the edges of the paper on both ends of the roll. This may cause feeding problems.
 Note
Note
-
For details on roll paper sizes and types that can be used, see "Paper Sizes" or "Paper Information List".
-
Remove the holder stopper from the Roll Holder.
-
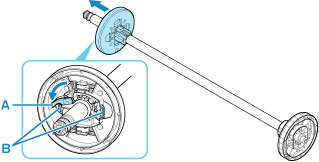
For Type X:
Rotate the holder stopper lever (A) towards
 to release the lock, and while holding it in position (B), remove holder stopper from the roll holder.
-
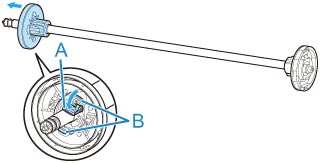
For Type Y:
Push holder stopper lever (A) toward shaft to release lock, and while holding in position (B), remove holder stopper from Roll Holder.
-
-
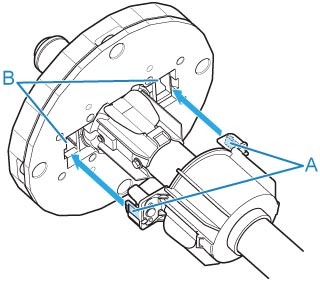
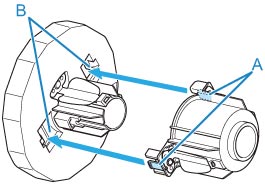
If using 3-inch core paper, align 3-Inch Paper Core Attachment tabs (A) with Roll Holder holes (B) and insert firmly.
-
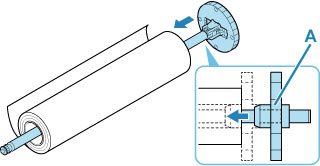
With leading edge of roll paper facing forward as shown, insert Roll Holder from right side of roll. Insert firmly until roll paper touches flange (A) of Roll Holder.
 Important
-
When loading a roll, be careful to avoid hitting the printer hard with the roll. This may damage the Roll Holder.
-
If you stand the roll holder vertically and set the roll paper by dropping, the roll holder may be damaged.
-
-
If using 3-inch core roll paper, attach 3-Inch Paper Core Attachment to holder stopper.
Align the tabs (A) of the attachment with the holes (B) of the holder stopper, and insert firmly.
-
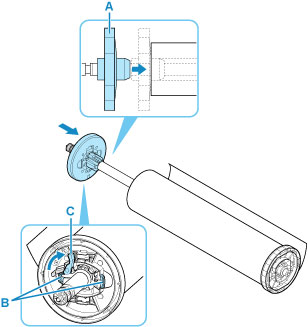
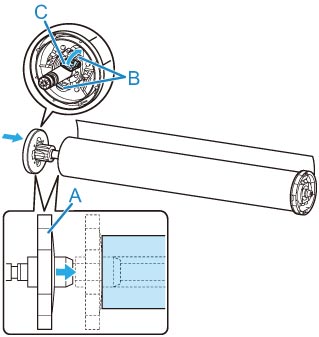
Insert the holder stopper into the Roll Holder, and then lock it in place.
-
For Type X:
Insert holder stopper from left into roll holder as shown, and then while holding in position (B), push firmly until holder stopper flange (A) touches roll paper. Lock the holder stopper lever (C) by rotating it towards
 .
.
-
For Type Y:
Insert holder stopper from left into Roll Holder as shown, and while holding in position (B), push firmly until holder stopper flange (A) touches roll paper. Lift holder stopper lever (C) from shaft to lock.
-

