
Forwarding Scanned Data to Computer Using Operation Panel
Before forwarding scanned data to the computer, check the following:
-
MP Drivers are installed. (Windows)
If MP Drivers are not yet installed, install MP Drivers with the Setup CD-ROM or install them from the Canon website.
-
When scanning via a network connection
Make sure the printer is connected to the computer correctly.
-
For Windows:
-
For macOS:
-
-
The destination and the file name are specified in Canon IJ Scan Utility (Windows)/Canon IJ Scan Utility Lite (macOS).
You can specify the destination and the file name in Canon IJ Scan Utility/Canon IJ Scan Utility Lite. For more on settings of Canon IJ Scan Utility/Canon IJ Scan Utility Lite:
-
For Windows:
-
For macOS:
-
Follow the procedure below to forward scanned data to the computer.
-
Select
 Scan on the HOME screen.
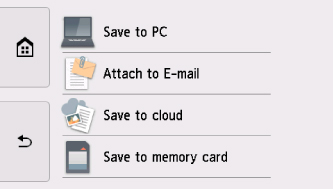
The screen for selecting to which you save the data is displayed.
-
Select
 Save to PC.
 -
Select a computer to forward scanned data.
Select Local (USB) for a USB-connected computer, or select the computer to forward the scanned data for a network-connected computer.
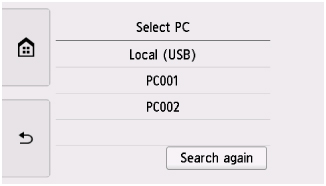
The Scan standby screen is displayed.
-
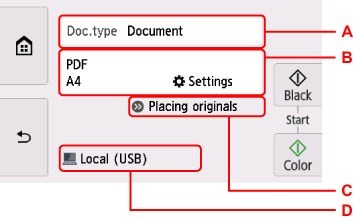
Specify settings as necessary.
-
A: Select the document type.
- Auto scan
-
The printer detects the type of the originals automatically and the image is forwarded in the optimized size, resolution and data format.
 Important
-
Load originals properly according to their type; otherwise, some originals may not be scanned properly.
For more on loading the original:
-
The following items cannot be scanned properly.
-
A4 sized photos
-
Documents smaller than 5 x 7 in. (127 x 178 mm) such as a paperback with its backbone cut off
-
Originals on thin white paper
-
Long and narrow originals such as panoramic photographs
-
-
- Document
- Select to scan the document.
- Photo
- Select to scan the photo.
-
B: Displays Scan settings screen.
For more on the setting items:
-
C: Displays how to load the original.
-
D: Displays the screen to select the destination.
-
-
Tap Black or Color.
 Note
Note- If the original is not loaded properly, a message is displayed on the touch screen. Load the original on the platen or in the ADF according to the scan settings.
-
If you load the original in the ADF:
The printer starts scanning and scanned data is forwarded to the computer.
-
If you load the original on the platen:
- When you select JPEG or TIFF for Format on the scan setting screen, the printer starts scanning and scanned data is forwarded to the computer.
-
When you select PDF or Compact PDF for Format on the scan setting screen, the confirmation screen asking you if you continue scanning is displayed after scanning is complete.
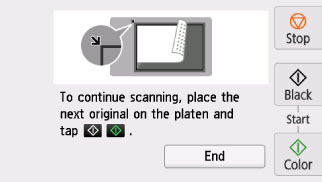
If you continue scanning, load the original on the platen and start scanning.
If you do not continue scanning, select End. The scanned data is forwarded to the computer.
Scanned data is forwarded to the computer according to the settings specified in Canon IJ Scan Utility/Canon IJ Scan Utility Lite.
Remove the original on the platen or from the document output slot after scanning is complete.
Important-
If the scanning result with Auto scan is not satisfactory, select the document type or size according to the original in step 6.
![]() Note
Note
-
You can use the following scanning method.
-
Scanning with a WIA-compliant application software (Windows)
For details:
-
Converting a scanned document to text (OCR)
For details:
-
For Windows:
-
For macOS:
-
-
Forwarding the scanned data to the computer using WSD (one of the network protocols supported in Windows)
-
-
When using Windows, the program selection screen may be displayed after tapping Color or Black.
In this case, select Canon IJ Scan Utility and click OK.
