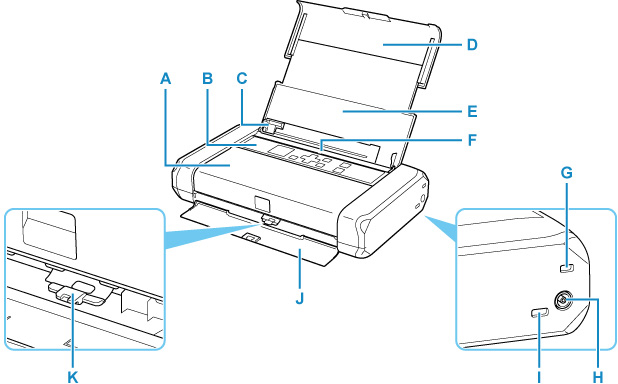
Front View

- A: Print Head Cover
- Open to replace an ink tank or to remove jammed paper inside the printer.
- B: Operation Panel
-
Use to change the settings of the printer or to operate it.
- C: Paper Guide
- Align with the left side of the paper stack.
- D: Paper Support
- Extend to load paper in the rear tray.
- E: Rear Tray Cover
- Open to load paper in the rear tray.
- F: Rear Tray
-
Load paper here. Two or more sheets of the same size and type of paper can be loaded at the same time, and fed automatically one sheet at a time.
- G: Security Slot
- Insert the security wire or other materials as a protection against theft.
- H: AC Adapter Connector
- Plug in the supplied AC adapter plug here.
- I: USB Port
- Plug in the USB cable to connect the printer with a computer.
- J: Paper Output Slot Cover
- Printed paper is ejected.
- K: Paper Thickness Lever
-
Switches the clearance between the print head and the loaded paper to match the media type.
Set to the left when printing on envelopes.
Set to the right when printing on paper other than envelopes.
 Important
-
Do not touch the metal casing.
-
Do not plug in or unplug the USB cable while the printer is printing with the computer. This can cause trouble.

