 Cannot Proceed beyond Printer Connection Screen/Connect Cable Screen

If you cannot proceed beyond the Printer Connection screen or the Connect Cable screen, check the following.
-
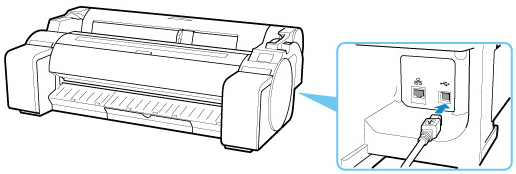
Check1 Make sure USB cable is securely plugged in to printer and computer.
Connect the printer and the computer using a USB cable as the illustration below. The USB port is located at the right side of the printer.

Check the items below only if you cannot proceed beyond the Printer Connection screen.
-
Check2 Follow procedure below to connect printer and computer again.
 Important
-
For macOS, make sure the lock icon is on the lower left of the Printers & Scanners screen (Print & Scan screen in Mac OS X v10.8 or Mac OS X v10.7).
If the
 icon (locked) is displayed, click the icon to unlock. (The administrator name and the password are necessary to unlock.)
-
Turn off printer.
-
Unplug USB cable from printer and computer and connect it again.
-
Turn on printer.
-
-
Check3 If you cannot resolve problem, follow procedure below to reinstall printer driver.
-
For Windows:
-
Click Cancel.
-
Click Back to Top on Setup Canceled screen.
-
Click Exit on Start Setup screen and finish setup.
-
Turn off printer.
-
Restart computer.
-
Make sure you have no application software running.
-
Perform setup on web page.
 Note
Note- You can use the Setup CD-ROM to redo setup.
-
-
For macOS:
-
Click Next.
-
If the screen telling you that installation has not been completed appears, click Abort on displayed screen and finish setup.
-
If the Connection failed. screen appears:
-
Click Next.
-
Click Next on displayed screen.
-
Click Back to Top on Select Printer screen.
-
Click Exit on Start Setup screen and finish setup.
-
-
Turn off printer.
-
Restart computer.
-
Make sure you have no application software running.
-
Perform setup on web page.
-
-

