
Registering Printer's Root Certificate to Local Computer for SSL Communication
To use Device Management Console or Accounting Manager, etc. when you connect the printer to a computer using SSL encrypted communication, you need to register (import) the printer's root certificate to your computer.
Procedure to register the certificate varies depending on your operation environment.
![]() Important
Important
-
If the printer is connected via IPv6 using Windows, you need to generate a server certificate using Remote UI.
For details, see Generating Server Certificate (Self-signed Certificate).
Operation procedure may differ depending on your OS version.
For Windows 10/Windows 8.1
The procedure below describes how to import a root certificate in Windows 10/Windows 8.1.
-
Select For secure communication.
 Note
Note-
You can download a certificate from Status Monitor.
-
Open status monitor.
Open the Printing Preferance, and select Status Monitor... on Main.
-
Download a certificate.
Select Download Security Certificate from the Remote UI menu.
-
-
-
Select Download.
The root certificate will be downloaded.
-
When download confirmation screen is displayed, select Open.
The Certificate screen appears.
-
Select Install Certificate.
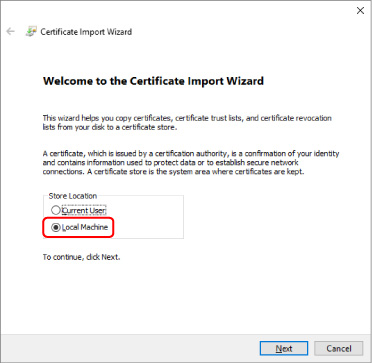
The Certificate Import Wizard screen appears.
-
Select Local Machine.
-
Select Local Machine on the startup screen of Certificate Import Wizard.
-
Select Next.
-
Select Yes on the displayed screen.
The Certificate Store screen appears.
-
-
Select Place all certificates in the following store.
-
Select Trusted Root Certificate Authorities.
-
Select Browse to open the Select Certificate Store screen.
-
Select Trusted Root Certificate Authorities from the list and select OK.
-
Select Next on the Certificate Store screen.
-
-
Select Finish.
When the Completing the Certificate Import Wizard screen appears, check the settings and select Finish.
For Windows 7
The procedure below describes how to import a root certificate in Windows 7.
![]() Important
Important
-
Be sure to create a certificate snap-in before importing a root certificate.
The root certificate will be registered to the local user if you import it without creating a certificate snap-in.
Creating Certificate Snap-in
-
Start up Microsoft Management Console.
Enter MMC on Search programs and files in the Start menu and press the Enter key.
-
Select Yes on displayed screen.
-
Select Add/Remove Snap-in from File menu.
The Add or Remove Snap-ins screen appears.
-
Add Certificate snap-in.
-
Select Certificates from Available snap-ins list and select Add.
-
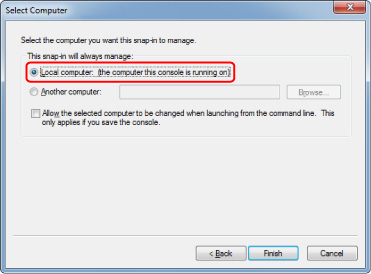
Select Computer account for This snap-in will always manage certificates for on the Certificates snap-in screen and select Next.
-
Select Local computer on the Select computer screen and select Finish.
-
Select OK on the Add or Remove Snap-ins screen.
-
Downloading Certificate
-
Select For secure communication.
Note-
You can download a certificate from Status Monitor.
-
Open status monitor.
Open the Printing Preferance, and select Status Monitor... on Main.
-
Download a certificate.
Select Download Security Certificate from the Remote UI menu.
-
-
-
Select Download.
-
Select Save.
Importing Certificate
-
Open Certificate Import Wizard.
-
On the left window, open Trusted Root Certificate from Certificate on Console Root.
-
Right-click Certificates and select Import from All tasks.
-
-
Specify certificate file to import.
-
Select Next.
-
Specify the certificate file to import on File name and select Next.
-
-
Specify certificate store.
-
Select Place all certificates in the following store.
-
Select Trusted Root Certificate Authorities for Certificates Store.
-
-
Finish certificate import wizard.
-
Select Next and check the specified settings.
-
Select Finish to finish the wizard.
-
Select OK on the displayed screen.
-
Checking Imported Certificate
Make sure the imported certificate has been registered to your computer.
-
Display certificate list.
On the left window of Microsoft Management Console, select Console Root > Certificates (Local Computer) > Trusted Root Certificate Authorities in this order, and Select Certificates to display the certificate list.
-
Check registered certificate.
Make sure the imported certificate name is displayed on the list.
Note- Make sure you can see the registered certificate from Current user by creating the Current user snap-in.
![]() Note
Note
- When you finish Microsoft Management Console, a message asking you whether to save the console setting. If you continue to apply the same settings next, select Yes to save.
For macOS
The procedure below describes how to import a root certificate in macOS.
-
Select For secure communication.
-
Select Download.
The root certificate will be downloaded.
-
Open downloaded certificate file.
When the download procedure is completed, a downloaded item pops up on the right of the screen.
Double-click the downloaded certificate on the list starts up Keychain Access and the Add Certificates screen appears.
Note- If the downloaded item does not pop up, select the Show Downloads
 button on the right.
 - Selecting the magnifying glass icon on the right of download list displays the folder containing the certificate.
- If the downloaded item does not pop up, select the Show Downloads
-
Select Add.
Select the destination for the certificate on Keychain.
Selecting Add displays information on the certificate.
Note- You can add the certificate by selecting the same certificate on Keychain Access. Check the name of certification to add after selecting View Certificates.
-
Check certificate.
Make sure the fingerprint of certificate shown on Details corresponds with the root certificate thumbprint of the printer.
The printer's thumbprint is displayed in Root cert. thumbprint (SHA-1) column or Root cert. thumbprint (SHA-256) column when tapped in the following order.
 (Printer information) > System information
 -
Select Always Trust.
If the fingerprint of certificate detail information matches printer's thumbprint, display information on certificate from the menu or by double-clicking the certificate, and select Always Trust on Trust.
The root certificate has been registered.
Note- Entering the password may be required if you specify it for your printer.
