
Loading the Upper Roll on the Printer
Follow these steps to load rolls in the printer.
 Important
-
Always load rolls when the printer is on. If the printer is off when you load a roll, the paper may not be advanced correctly when you turn the printer on.
-
Before loading a roll, confirm whether the inside of the top cover or the output guide is soiled. If these areas are dirty, we recommend cleaning them in advance. (See "Cleaning Inside the Top Cover.").
-
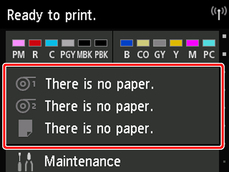
Tap paper settings display area on Home screen of touch screen.
 Note
Note-
If the Home screen does not appear, tap the Home button.
-
-
Tap
 area.
area. -
Tap Load paper. or Replace paper, check message that appears, and then tap Yes.
Note-
If any cut sheet has been fed, or roll paper that will not be used has been fed from Roll 1 (Upper), a message is shown requesting you to remove it.
After following the instructions on the screen to remove the paper, redo the operation.
-
If roll paper is loaded in Roll 1 (Upper) but Roll 1 (Upper) is not selected as the paper source, a message asking you whether or not to change paper is displayed.
Tap Replace paper, remove the paper, and go to the next step.
-
-
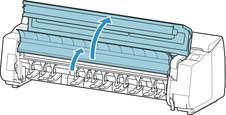
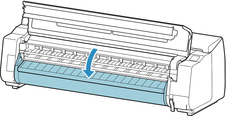
Open top cover and lift output guide.
-
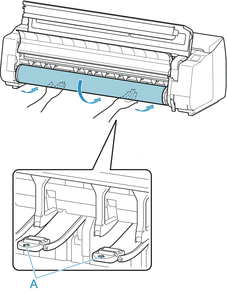
Hold flanges (A) so that roll holder's white gear is on left, align roll holder shaft with roll holder slot left and right guide grooves (B), and load.

 Caution
-
Be careful not to drop the roll and hurt yourself when loading it.
-
Be careful not to pinch your fingers between the Roll Holder shaft and the guide grooves (B) when loading the roll paper.
Important-
If the leading edge of the roll paper is secured with tape or a paper band so that it will not unravel, remove the tape or paper band before loading the roll paper into the roll holder slot.
If you load the paper into the roll holder slot with the leading edge secured, only part of the roll paper is fed to the paper feed slot, resulting in damage to the roll paper.
Note-
For the procedure for attaching the roll paper to the Roll Holder, see "Loading Rolls on the Roll Holder."
-
-
Pull out roll paper evenly, insert leading edge between roll paper and arrows (A) directly beneath it, and feed roll paper until you hear a sound.
 Important
-
If the roll paper has become unwound, remove the slack before loading the roll paper.
-
When feeding the leading edge of the roll paper, make sure the entire width of the roll paper is separating and feeding from the roll. If the roll paper is fed with some of the roll paper still stuck to the roll, the roll paper will be damaged.
-
Be careful not to soil the printing surface of roll paper as you insert it in the slot. This may affect the printing quality. We recommend wearing clean cloth gloves when handling rolls to protect the printing surface.
-
If the paper is wrinkled or warped, straighten it out before loading it.
-
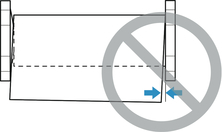
Load the roll so that there is no gap between the right edge of the paper and the Roll Holder.
-
Depending on the paper, the roll paper may be scratched when being fed and not feed well. In this case, you must feed the paper manually after setting Paper retention setting to Release on the touch screen. Lift the release lever, advance the roll paper until its leading edge appears on platen, lower the release lever, and then proceed to the next step. However, if Paper retention setting is set to Release, automatic switching of the upper and lower rolls is not possible.
-
-
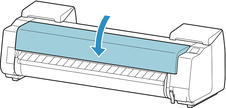
Lower output guide.
-
Close top cover.
-
Tap Start feeding.
The paper is now advanced.
-
Once paper feeding starts, you will need to do the following, based on the Manage remaining roll amount setting and the barcode printed on rolls. (See "Keeping Track of the Amount of Roll Paper Left.")
Manage remaining roll amount
Barcodes
Printer Operation After the Paper is Fed
Disable
Printed
A menu for selecting the media type appears on the touch screen.
Operate the touch screen and select the media type to be used.
Not printed
Enable
Printed
The type and amount of paper left is automatically detected based on the barcode printed on the roll.
There is no need to specify the type and length of the paper.
Not printed
A menu for selection of the media type and length is shown on the touch screen.
Operate the touch screen, select the media type to be used, and enter its length.
Important-
Cut the edge of the roll using the Cut paper function if the edge is creased or soiled. (See "Specifying the Cutting Method for Rolls.")
-
When selecting the media type on the touch screen, make sure the media type set in the printer driver and the media type loaded on the printer match.
Note-
For details on media types that you can select, see "Paper Information List."
-
Adjusting the printhead alignment with the type of paper to be used in printing may enhance printing quality. (See "Automatic Adjustment to Straighten Lines and Colors.")
-
