
Sending Fax to Registered Recipient
Registering recipient's fax/telephone number and name in the printer's directory enables you to send faxes easily.
![]() Important
Important
-
It may be possible that faxes will reach unintended recipients due to the misdialing or incorrect registration of fax/telephone numbers. When you send important documents, we recommend that you send them after speaking on the telephone.
![]() Note
Note
-
For details on the basic sending operations:
-
Select
 FAX on HOME screen.
The Fax standby screen is displayed.
-
Change send settings as necessary.
-
Press left Function button.
The screen to select a registered recipient is displayed.
-
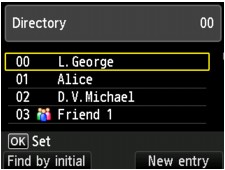
Select a registered recipient.
Display by name
Display by ID number
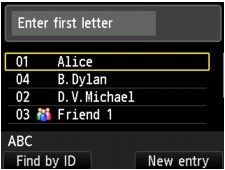
By entering the initial letter using the Numeric buttons, the registered recipients are sorted by name.
By entering the ID number using the Numeric buttons, the registered recipients are searched by ID number.
Select a recipient, and then press the OK button.
Select a recipient, and then press the OK button.
The screen to select a operation for selected recipient appears.
The screen to select a operation for selected recipient appears.
 Note
Note- To switch the display by name and by ID number, press the left Function button.
-
If you press the left Function button, you can register a new recipient or a new group dial.
-
Select Send FAX as operation for selected recipient, and then press OK button.
The LCD returns to the Fax standby screen.
Note-
You can edit or delete a selected recipient.
-
-
Press Color button for color transmission, or Black button for black & white transmission.
 Important
- Color transmission is available only when the recipient's fax device supports color faxing.
![]() Note
Note
- To cancel a fax transmission, press the Stop button. To cancel a fax transmission while it is in progress, press the Stop button, and then follow the instructions on the LCD.
- If documents remain in the ADF after the Stop button is pressed while scanning is in progress, Document in ADF. Select
 to eject document. is displayed on the LCD. By pressing OK, the remaining documents are automatically ejected.
 -
In case the printer was not able to send a fax, such as when the recipient's line was busy, it has the function to automatically redial the number after a specified interval. Automatic redialing is enabled by default.
To cancel automatic redialing, wait until the printer starts redialing, and then press the Stop button.
