Front View

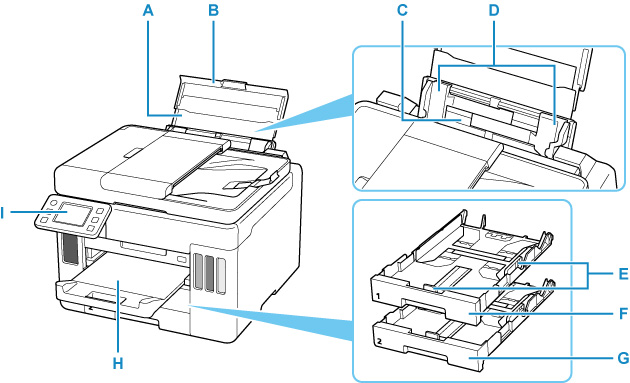
- A: Paper Support
- Extend to load paper in the rear tray.
- B: Rear Tray Cover
- Open to load paper in the rear tray.
- C: Rear Tray
-
Load paper here. Two or more sheets of the same size and type of paper can be loaded at the same time, and fed automatically one sheet at a time.
- D: Paper Guides
- Align with both sides of the paper stack.
- E: Paper Guides
- Align with right/left/front sides of the paper stack.
- F: Cassette 1
-
Load A4, B5, A5, or Letter-sized plain paper into the cassette, and insert it into the printer.
- G: Cassette 2
-
Load A4 or Letter-sized plain paper into the cassette, and insert it into the printer.
- H: Paper Output Tray
- Printed paper is ejected. Pull out it before printing.
- I: Operation Panel
-
Use to change the settings of the printer or to operate it.

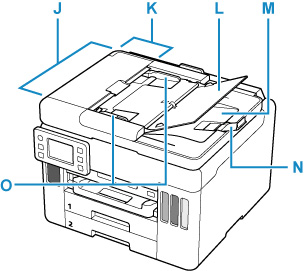
- J: ADF (Auto Document Feeder)
-
Load a document here. The documents loaded in the document tray are scanned automatically one sheet at a time.
- K: Document Feeder Cover
- Open when clearing jammed documents.
- L: Document Tray
- Open to load a document in the ADF. You can load two or more sheets of document of the same size and thickness. Load the document with the side you want to scan facing up.
- M: Document Output Slot
- Documents scanned from the ADF are delivered here.
- N: Document Stopper
- Open the original stopper to support the ejected original.
- O: Document Guide
- Adjust this guide to match the width of document in the ADF.

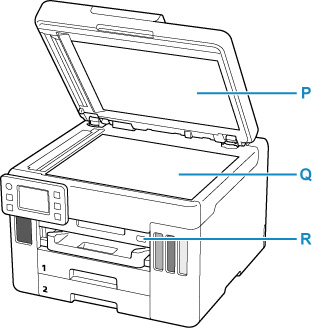
- P: Document Cover
- Open to load an original on the platen.
- Q: Platen
- Load an original here.
- R: USB Flash Drive Port
- Insert USB flash drives here.

