
Encrypting Communication: TLS (SSL)
Set this encryption to increase the level of security for communication when the printer operates as a server (HTTP/IPP, etc.) A certificate and key pair is used in encrypted communication.
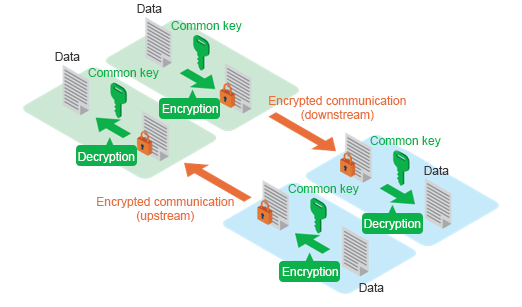
Example of server authentication:
Server (printer) – client (computer) communication proceeds as follows.
-
[Client] Request connection with encrypted communication.
-
[Server] Send server certificate and public key set.
-
[Client] Create common key.
-
[Client] Use received public key to encrypt common key and send to server (printer).

-
[Server] Decrypt received common key with private key.
-
[Client/server] Use matching common key to encrypt/decrypt data route taken by sent and received data to establish encrypted communication.
Canon Printers use a key and certificate (server certificate) stored in the printer, used for TLS encrypted communication, in carrying out Remote UI communication and IPP communication wherein the printer acts as an TLS (SSL server). In addition to the default certificate pre-installed in the printer, a certificate generated by the user with Remote UI or an externally created certificate can also be used as a server certificate.
Patterns that can be used for registering a digital certificate for TLS (SSL) communication are as follows. Select a pattern for registering the certificate.
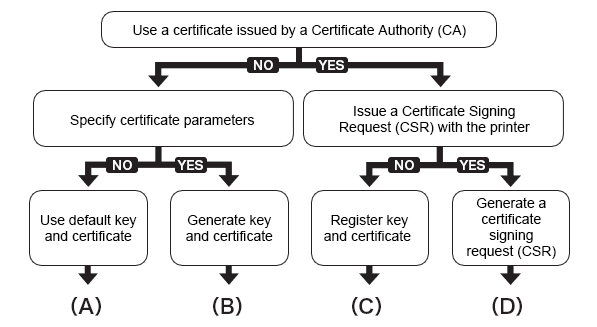
(A)Use default key and certificate:
The default key and certificate already installed in the printer can be used. In this case, it is not required to use Remote UI to register a key and certificate.
(B)Generate key and certificate:
To use a certificate having information you set yourself, such as a common name and validity period, you can use Remote UI to generate a new key and certificate.
-
Remote UI
Security > TLS server settings > Generate key and certificate > Generate self-signed cert
-
Set required items.
-
Key algorithm: select one of ECDSA, RSA. If you select ECDSA, select one of secp256r1, secp384r1, secp521r1 as the Key type.
-
Signature algorithm: select one of SHA256, SHA384, and SHA512.
-
Public key bit length: Select 2048 bits.
-
Validity:
Enter the date the server certificate is created in Valid from.
Enter the expiration date of the server certificate in Valid to.
-
Common name: Enter letters and numbers.
-
-
Select Next.
Country, State or province, Locality, Organization, and Organizational unit can be entered optionally.
-
Select Generate.
The server certificate is then generated.
-
Select Restart LAN.
The signed server certificate is created with the root certificate generated with the printer.
Depending on the web browser type and version, an alert indicating that secure communication is not possible may be displayed.
(C) Register key and certificate (use an externally created certificate):
You can use a key and certificate or CA certificate obtained from an issuing organization. Use Remote UI to upload the obtained key and certificate files.
-
Remote UI
Security > TLS server settings > Upload key and certificate
-
Select the file format.
Select PKCS#12 (*.pfx/*.p12) or DER (*.der, *.cer, etc.).
-
Select the files, and enter the password.
-
Select the Upload button.
-
If the administrator password is requested, enter the administrator password.
-
Select the Restart LAN button.
(D) Generate a certificate signing request (CSR):
Since a certificate generated with the printer is not signed by a certificate authority, a communication error may result depending on the connected device.
To obtain a certificate signed by a certificate authority, it is necessary to send a CSR (certificate signing request) file to a certificate authority and have a certificate issued.
Use Remote UI in administrator mode to generate the CSR. After the certificate is issued, upload the certificate with Remote UI
-
Remote UI
Security > TLS (SSL) settings > Upload key and certificate > Generate CSR (cert request)
When A generated CSR already exists. If you start generating, the existing CSR will be deleted. Continue to generate? is displayed, select Yes.
-
Set required items.
-
Signature algorithm: select one of SHA256, SHA384, and SHA512.
-
Public key length (bits): Select 2048 bits.
-
Common name 2
-
-
Select Next.
Country, State or province, Locality, Organization, and Organizational unit can be entered optionally.
-
Select Generate.
-
Select Download.
Specify where to save the CSR and save.
Send the saved CSR file to a certificate authority, and have a certificate issued that is signed by the certificate authority (CA certificate). Upload the CA certificate following the steps at (C).
![]() Important
Important
-
To reset a generated server certificate, make the following setting in the Remote UI.
Remote UI
Security > TLS server settings > Delete key and certificate > OK > Restart LAN
![]() Note
Note
-
If you cannot access to Remote UI after you restart LAN, reload your web browser.
-
If necessary, set the version range of the TLS that will be used for encrypted communication. This setting is applied when the printer operates as a TLS server.
Remote UI
Security > TLS server settings > Advanced TLS settings > Maximum or Minimum > Select version.
Specifications of keys and certificates that can be used for encrypted communication.
