
 Colors Are Unclear

Although some air may enter the ink tube, it is not a malfunction. No problem if the nozzle check pattern is printed correctly.
-
Check1 Make sure joint button is not lifted up.
Push the print head locking cover to make sure the print heads are installed properly.
Next, push the joint buttons firmly to the end.
 Important
-
Remove the orange label and the protective tape of the print head to install it.
-
-
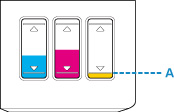
Check2 Check the remaining ink level.
When an ink tank runs out of ink, refill the ink tank.
If the remaining ink level is below the lower limit line (A), refill the ink tank with the corresponding color of ink.
 Note
Note-
Printed colors may not match screen colors due to basic differences in the methods used to produce colors. Color control settings and environmental differences can also affect how colors appear on the screen. Therefore, colors of printing results may be different from those on the screen.
-
-
Check3 Are the print head nozzles clogged?
Print the nozzle check pattern and make sure that the ink is coming out normally.
For details on printing the nozzle check pattern, print head cleaning, and print head deep cleaning, see If Printing Is Faint or Uneven.
-
Step1 Print the nozzle check pattern.
After printing the nozzle check pattern, examine the pattern.
-
For Windows:
-
For macOS:
If the pattern is not printed correctly, go to the next step.
-
-
Step2 Clean the print head.
After cleaning the print head, print the nozzle check pattern and check the result.
-
For Windows:
-
For macOS:
If it does not improve, clean the print head again.
If it still does not improve, go to the next step.
-
-
Step3 Clean the print head deeply.
After cleaning the print head deeply, print the nozzle check pattern and check the result.
-
For Windows:
-
For macOS:
If it does not improve, turn off the printer, wait for more than 24 hours, and go to the next step.
-
-
Step4 Clean the print head deeply again.
After cleaning the print head deeply again, print the nozzle check pattern and check the result.
If it still does not improve, go to the next step.
-
Step5 Perform ink flush.
After performing ink flush, print the nozzle check pattern and check the result.
Ink flush consumes a great amount of ink. Frequent ink flush can rapidly consume ink, so perform it only when necessary.
If the nozzle check pattern is not printed correctly even after performing ink flush, check the installing condition of the print head.
-
