Perform Replace Ink in Print Head
Replace Ink in Print Head consumes a great amount of ink.
Frequent Replace Ink in Print Head can rapidly consume ink, so perform it only when necessary.
![]() Important
Important
-
Replace Ink in Print Head may damage the printer when the remaining ink level is not enough.
-
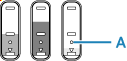
Before Replace Ink in Print Head, check the remaining ink level of all colors. If the remaining ink level is below the single dot (A), refill the ink tank of corresponding color.
-
When Replace Ink in Print Head, check the free space of the maintenance cartridge.
Replace Ink in Print Head consumes a lot of ink, and the consumed ink is discharged to the maintenance cartridge. If the free space is low, replace it with a new maintenance cartridge. If the available capacity of the maintenance cartridge is low, a message is displayed and Replace Ink in Print Head cannot be performed.
Perform Replace Ink in Print Head following the procedure below.
-
Check that printer is turned on.
-
Select
 (Setup) on HOME screen.
 -
Select Maintenance.
-
Select Replace Ink in Print Head.
-
Check displayed message and select OK.
-
Check displayed message and select Yes or No.
-
Check displayed message and select Yes.
Select No to return to Maintenance.
Before returning, perform Deep Cleaning.
-
Select Color, BK or All colors.
-
When the support code "5212" was displayed, select BK.
-
When the support code "5213" was displayed, select Color.
-
When the support codes were not displayed, select All colors.
-
-
Check displayed message and select Yes.
-
Check displayed message and select Yes.
Replace Ink in Print Head starts.
![]() Note
Note
- Do not perform any operations while Replace Ink in Print Head is in progress.
