
 How to Perform Ink Flush

Ink flush consumes a great amount of ink.
Frequent ink flush can rapidly consume ink, so perform ink flush only when necessary.
![]() Important
Important
-
Performing ink flush when the remaining ink level is not enough may damage the printer.
-
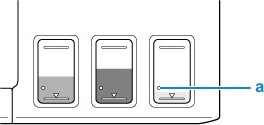
Before performing ink flush, check the remaining ink level of all colors. If the remaining ink level is below the single dot (a), refill the ink tank of corresponding color.
-
When performing an ink flush, check the free space of the maintenance cartridge. Ink flush consumes a lot of ink, and the consumed ink is discharged to the maintenance cartridge. If the free space is low, replace it with a new maintenance cartridge. If the available capacity of the maintenance cartridge is low, a message is displayed and ink flush cannot be performed.
Perform ink flush following the procedure below.
-
Press Setup button.
The Setup menu screen appears.
-
Select Maintenance and press OK button.
-
Select Ink Flush and press OK button.
-
Select All colors, Color or BK and press OK button.
-
Check displayed message and press OK button.
-
Check displayed message, select Yes and then press OK button.
-
Check displayed message, select Yes and then press OK button.
Ink flush starts.
![]() Note
Note
-
Do not perform any operations while ink flush is in progress. It takes approximately 5 to 6 minutes to complete.
