Adding Text
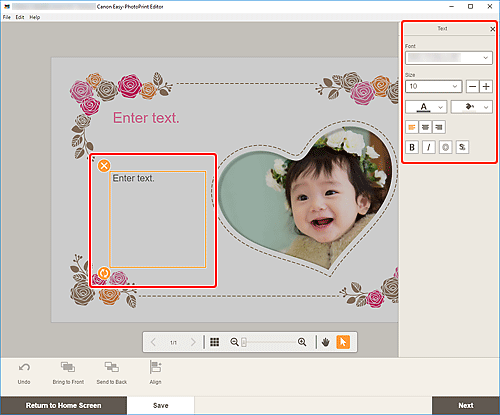
In the Item edit screen, you can enter text into text boxes in items.
 Note
Note
- You can also add text boxes. For details, see Adding/Adjusting Text Boxes.
-
In Item edit screen, click text box in item.
The Text palette appears on the Sidebar of the Item edit screen.

-
Click selected text box again to activate text entry mode.
-
Enter text in text box.
 Important
- Emoji cannot be printed.
- Some symbols may not be printed.
-
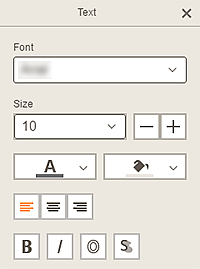
Use Text palette to change font type, font size, font color, text position, etc.

 Note
Note- The displayed contents vary depending on the item.
- Font
- Select the font type.
- Size
-
For horizontal and vertical text boxes, select the font size from the range of 5 to 500 points.
For arched text boxes, select the font size from the range of 5 to 100 points.
 (Decrease Font Size)
- Decreases the font size with each click.
 (Increase Font Size)
- Increases the font size with each click.
 (Font Color)
-
Select the font color.
Click to display the color selection chart. Select the color you want to set.
 (Fill Color)
-
Select the fill color for the text box.
Click to display the color selection chart. Select the color you want to set.
 (Align Left/Align Center/Align Right)
-
Set how you want to align text.
 Note
Note- For vertical text boxes, you can select from
 (Align Top/Align Middle/Align Bottom).
- For vertical text boxes, you can select from
 (Bold/Italic/Outline/Shadow)
-
Set the font style.
You can also set multiple font styles.
 Note
Note- Available font styles vary depending on the selected font.
When text box is added to disc label:
 (Rectangle)
- Enter text horizontally.
 (Arch)
- Enter arched text.
 (Inward Text)
-
Positions the text with the characters facing inward.
 Note
Note- This appears when the Arch Up or Arch Down text box is clicked.
 (Outward Text)
-
Positions the text with the characters facing outward.
 Note
Note- This appears when the Arch Up or Arch Down text box is clicked.
-
Click outside item.
The text box is reflected in the item.

