Print Settings Screen
Specify the print settings and start printing.
To print a photo, select it in the Photo Locations screen to switch to the Print Settings screen.
To print an item, click Next in the Item edit screen to switch to the Print Settings screen.
 Note
Note
- The displayed settings vary depending on your printer and item type.

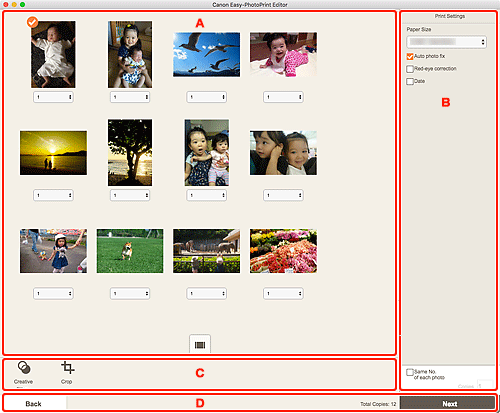
A: Print Preview Area
Check the print preview or set the number of copies to print.
To switch the view for preview images between single image view and thumbnail list view, click  (Single Image View) or
  (Thumbnail List View) in the Print preview area.
In Thumbnail List View:
 (Copies)
-
Set the number of copies to print.
 Note
Note- This appears only for photo printing.
 (Single Image View)
- Click to switch to single image view.
In Single Image View:
 (Copies)
-
Set the number of copies to print.
 Note
Note- This appears only for photo printing.

 (Previous Page/Next Page)
- Switches the displayed page when there are multiple photos or when there are multiple pages in the item.
 (Thumbnail List View)
- Click to switch to thumbnail list view.
 (Zoom Out/Zoom In)
- Click
 (Zoom Out) or
  (Zoom In) to reduce or enlarge the display size. You can also freely change the display size by dragging the slider.
B: Print Settings Area
Set the number of copies to print, Red-eye correction, and other settings.
- Paper Size
-
Select the size of the paper to use.
 Note
Note- This appears only for photo printing.
- Auto photo fix
- Select this checkbox to correct photos automatically.
- Red-eye correction
- Select this checkbox to correct red eyes caused by a camera flash.
- Date
- Select this checkbox to add dates to the photos before printing.
 Note
Note- This appears only for photo printing.
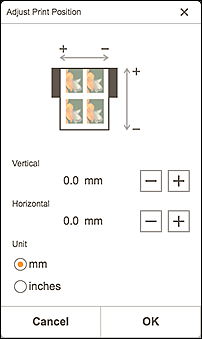
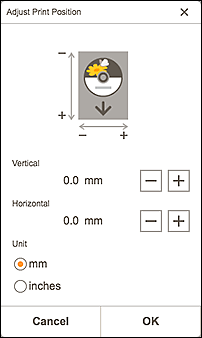
- Adjust Print Position
-
Displays the Adjust Print Position screen.
If the printed image is out of position, adjust the print position in the Adjust Print Position screen.
Business card and sticker:
Adjust the vertical and horizontal print positions separately based on the print direction in 0.01 inch or 0.1 mm increments within the range of -0.08 inch (-2.0 mm) to +0.08 inch (+2.0 mm).

Disc label:
Adjust the vertical and horizontal print positions separately based on the print direction in 0.01 inch or 0.1 mm increments within the range of -0.2 inch (-5.0 mm) to +0.2 inch (+5.0 mm).

- Same No. of each photo
-
Set the number of copies to print for all the photos at once.
 Note
Note- This appears only for photo printing.
- Copies
- Set the number of copies to print.
C: Editing Tools Area
 Note
Note
- This appears only for photo printing.
 Creative Filters
-
Switches to the Creative Filters screen and you can turn photos black and white, enhance them to resemble retro photos, and more.
 Crop
Crop-
Switches to the Crop screen and you can crop photos.
D: Switch Screen Area
- Back
- Return to the previous screen.
- Total Copies
- Displays the total number of print copies.
- Next
- The Print dialog appears.

