
Printer Management Dialog Box
You can register and unregister managed printers.
You can also change settings, and export and import information for managed printers.
Printer Management Dialog Box
Click the  Printer Management button or select Manage Printer in Printer from the File menu to open the Printer Management dialog box.
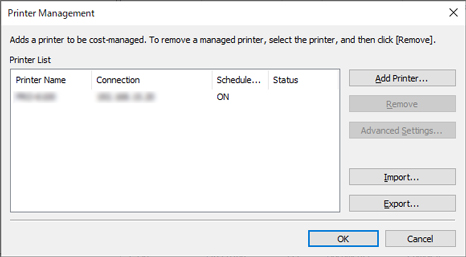
- Printer List
-
Displays the list of managed printers.
-
- Printer Name
-
The printer name appears.
- Connection
-
The found printer address information (connection) appears.
-
The printer's IP address appears for IPv4 and IPv6 connections, and the connection port name appears for USB-connected printers.
- Scheduled Acquisition
-
ON appears for printers performing scheduled acquisition and OFF appears for printers not performing scheduled acquisition.
- Status
-
Information about the printers found appears.
- Add Printer button
-
The Add PrinterDialog Box appears.
-
Printers added in the Add Printer dialog box appear in the printer list.
- Remove button
-
The selected printer is removed (unregistered) from the managed printers.
-
You can also leave unregistered printers in the printer list and continue to check job costs.
-
Disabled if no printers are selected or if multiple printers are selected.
- Advanced Settings button
-
The Advanced Printer Settings Dialog Box appears.
-
You can check and change Printer Name, check Serial Number, check Scheduled Acquisition Settings, set Authentication Password, and perform Auth. Test.
-
Disabled if no printers are selected or if multiple printers are selected.
- Import button
-
Imports the managed printer(s) from a file.
-
The managed printers that are imported in Printer List appears.
-
 Note
Note-
When you click the Import button to import a file, the Select Printer screen will appear. Printers with connection methods that are not supported by Windows will not appear in the Printer List on the Select Printer screen.
Example: Printers connected by Bonjour registered with the Mac version
-
- Export button
-
Exports the managed printers displayed in Printer List to a file.
-
Note
-
The print list to be exported does not include the authentication password used at the time of job log acquisition.
After importing, an authentication password must be set.
-
A printer connected by USB cannot be exported.
-
Add PrinterDialog Box
Search for printers to be registered in the printer list on the main screen, and register managed printers.
Click Add Printer button on Printer Management dialog box to display Add Printer dialog box.
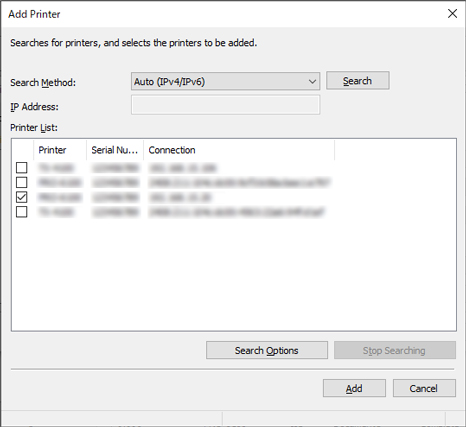
- Search Method
-
Select the printer search method.
- IP Address
-
Enter an IP address.
-
Disabled if something other than IPv4 or IPv6 is selected in Search Method.
- Search button
-
Searches for printers using the selected Search Method.
- Printer List
-
A list of printers found appears.
-
- Printer
-
The model names of the printers found appears.
- Serial Number
-
The serial numbers of printers found appear.
- Connection
-
The found printer address information (connection) appears.
-
The printer's IP address appears for IPv4 and IPv6 connections, and the USB port name appears for USB-connected printers.
- Stop Searching button
-
Click to stop the search.
-
The search stops after waiting until the information acquisition is completed for printers that have been found already.
- Search Options Button
-
Opens the Search Options dialog box.
-
Configure this when searching by SNMP Community.
- Add button
-
Closes the Add Printer dialog box.
-
Printers selected in the printer list appear in Printer List of the Printer Management dialog box as managed printers.
Advanced Printer Settings Dialog Box
You can configure advance settings for managed printers.
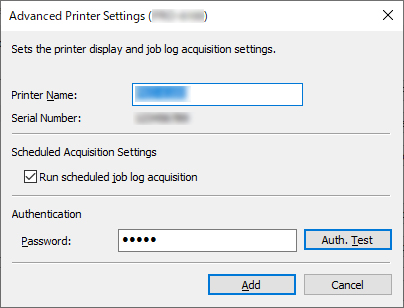
- Printer Name
-
Specify the printer's display name in Accounting Manager.
- Serial Number
-
The serial numbers of printers appear.
- Scheduled Acquisition Settings
-
Set whether to perform scheduled acquisition of job logs.
-
To stop regular acquisition of job logs, clear the Run scheduled job log acquisition option.
-
 Important
-
Scheduled acquisition settings are enabled when the printer is registered. Job logs cannot be collected if the scheduled acquisition settings are disabled.
-
- Authentication
-
Set an authentication password for job log acquisition.
-
Note
-
Enter the password set for the printer.
-
For details, search for and refer to the "Administrator Password" page from the home page of the Online Manual for your model.
-
-
Important
-
If the job history is set to hide on the printer control panel, authentication information is required when acquiring job logs.
-
- Auth. Test button
-
To perform an authentication test for job log acquisition, enter the Password and click the Auth. Test button.
-
The authentication test results for job log acquisition appear in a message dialog box.
- Add button
-
Changes the settings for the managed printer, and then closes the Advanced Printer Settings dialog box.
